- Introduction
- Creating the Demonstration System
- Preparing the Infrastructure
- Mail Routing in the Demo System: An Overview
- Setting up and Installing the Demo System
- Enabling the SMTP Virtual Server
- Downloading the Mail Server
- Installing and Configuring the Demonstration machine
- Configuring the Installed Components
- Installing Tool Packs
- Creating a Demonstration System: In Summary
Introduction #
BPA Platform is normally deployed in a distributed fashion across an enterprise network. In this deployment, agents are needed to enable the BPA Platform server to communicate with other servers and to support event-driven tasks.
On occasion, a full-scale deployment may be impractical or undesirable. You may, for instance, have to use a single, standalone machine for field training or to demonstrate the product to a potential customer.
When a standalone set-up is unavoidable, it’s always best to make use of a virtual machine running a server operating system. This allows more features to be demonstrated than could otherwise be done.
Creating the Demonstration System #
To create a demonstration system, you need to carry out a number of tasks, which can be divided into two main stages:
- Setting up the infrastructure
- Installing BPA Platform
Setting up the Infrastructure #
Before installing BPA Platform, you prepare the supporting infrastructure by undertaking the following:
- Set up a virtual machine (you do this to enable you to use a server operating system)
- Install the application software that you wish to work alongside BPA Platform
- Set up the SMTP Virtual Server under Microsoft IIS
- Install an SMTP mail server (such as ArGoSoft Mail Server)
Installing BPA Platform #
Once you have set up the supporting infrastructure, you can install the BPA Platform server, client and other features you will need on your demonstration system and then configure them using the Configurator. Refer to the following section: Installing the BPA Platform Components
Preparing the Infrastructure #
Introduction #
A standalone system lacks the network infrastructure of a standard deployment; but you can put in place an infrastructure to provide as much of the functionality of a standard installation as possible.
You should prepare this supporting infrastructure before installing BPA Platform on the standalone machine. Considerations include deciding which operating system, virtualisation and third-party enterprise software to use, checking system resources and getting the necessary license for the standalone installation.
Operating system #
Your choice of operating system determines what features will be available for demonstrating.
A server operating system will allow demonstration of all the BPA Platform features.
A workstation operating system will impose restrictions on the BPA Platform features available. For example, you would be unable to deploy an SMTP virtual server or a web server that supports multiple web sites.
Virtualisation #
Virtualisation software should be installed on the demonstration machine. Both VMware and Microsoft virtualisation products are supported.
System resources #
The resource requirements of a standalone installation are not as demanding as in a standard deployment. You should give due consideration to the influence of a system performance on a customer perception when delivering a demonstration.
Application software #
On the demonstration platform, you will need to install the necessary third-party application software with which BPA Platform interacts.
Such applications may include Microsoft SQL server, Microsoft SMS Server, Microsoft Internet Information Services components, including SMTP virtual Server and Oracle Server products.
Licensing #
All partners receive their own set of BPA Platform license keys for in-house and demonstration use of the product. You will need to use one of these keys for the standalone installation.
Mail Routing in the Demo System: An Overview #
One of the tasks when creating a demonstration system is to set up mail routing.
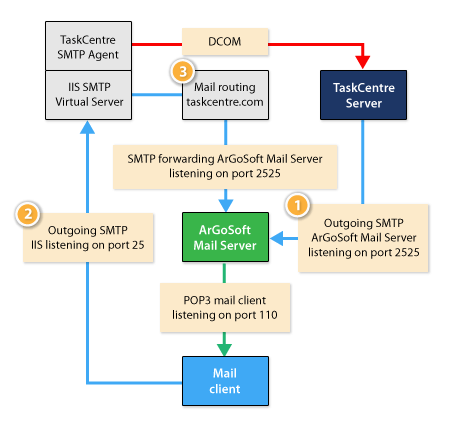
BPA Platform both sends outbound email, used for example for alerts, and receives inbound email used for mail triggered events.
Inbound email is generated by a mail client; outbound email is generated from the BPA Platform server.
This example provides a scenario for a standalone environment. It doesn’t necessarily reflect normal practice in a corporate mail environment.
1. Outbound BPA Platform server mail
Outbound mail from the BPA Platform server is read by the mail client using the POP3 protocol and resides on the ArGoSoft Mail Server.
2. Outbound mail client- mail
Outbound mail from the mail client is used as a trigger opportunity for the BPA Platform server and is routed to the SMTP virtual server on Microsoft IIS.
3. Routing to ArGoSoft mail server
The mail coming from the mail client, which is used as a trigger opportunity, is then routed to ArGoSoft Mail Server via the domain routing ‘task centre.com’, set up in Microsoft IIS.
Setting up and Installing the Demo System #
Now that you have some background to the requirements and limitations of a demo system, let’s look in more detail at the two main parts of the process -setting up the infrastructure and then installing BPA Platform on the demo machine.
Introduction #
As you have learnt, before actually installing BPA Platform on the demonstration machine, you have to prepare some supporting infrastructure and software.
Let’s examine the following in detail;
- Deciding on virtualisation
- Installing additional third-party software
- Setting up the Microsoft SMTP Virtual Server
- Installing and configuring the ArGoSoft mail server
- Configuring the email client.
Set up a Virtual Machine #
BPA Platform is designed to run on a server operating system. If you install the product on a machine not running a server operating system, some of its functionality will be unavailable.
For a demonstration machine, it is preferable to have the full BPA Platform feature set available for demonstrating.
One simple way of achieving this is to run the demonstration machine on a viral machine.
The Required Third-Party Applications #
Having set up a virtual machine, you can install on it all of the third-party primary applications you’ll want to use with BPA Platform.
You may have to consult the relevant third-party documentation for guidance.
Enabling the SMTP Virtual Server #
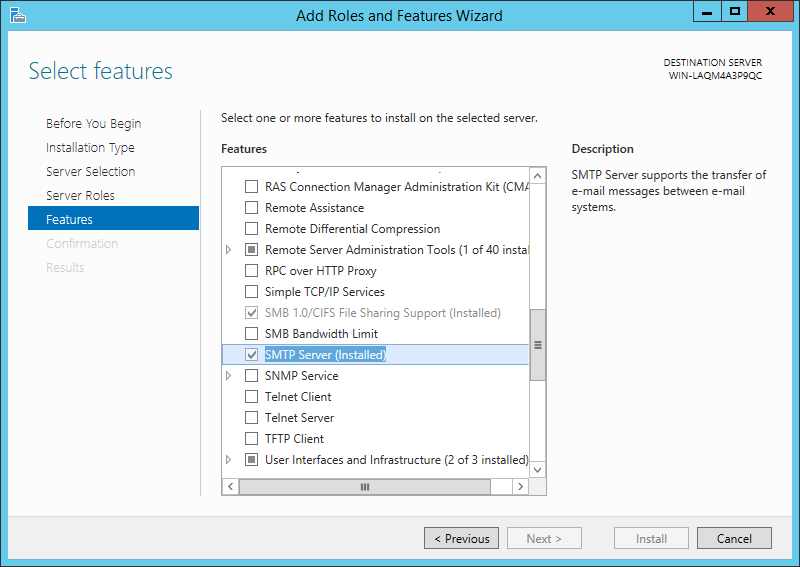
In order for the Email Trigger (SMTP) Agent to work you need to have the SMTP Virtual Server enabled. This is a component of Microsoft Internet Information Services (IIS).
- Enable the SMTP Virtual Server via Control Panel – Programs and Features – Turn Windows features on or off.
- The Server Manager dialog box will open. Here you enter the Features menu of the navigation pane and then tick the SMTP Server option from the list followed by Install.
Configuring the Outbound Port #
When you open the Internet Information Services (IIS) 6.0 Manager, you’ll see the SMTP Virtual Server displayed in the navigation pane under the local computer name.
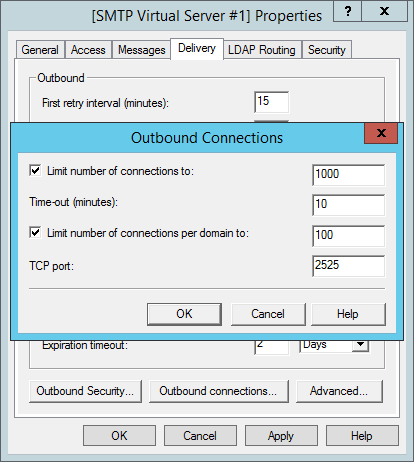
You now need to change the outbound connection port for the SMTP Virtual server to 2525.
This is achieved as follows:
- Right -click the SMTP Virtual Server folder and select Properties
- In the SMTP Virtual Server properties dialog, select the Delivery tab.
- Click the Outbound connections button
- Enter 2525 in the TCP port text box
Testing the Inbound Port #
Now you should check whether the inbound port of IIS is clear and ready to accept incoming mail.
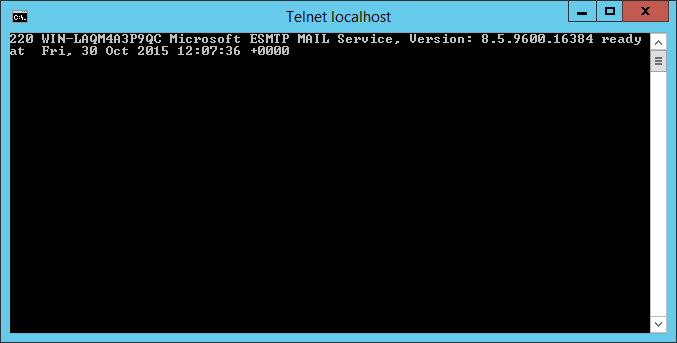
A simple test can be carried out by using Telnet:
- Open the Command prompt
- Type Telnet Localhost 25
- Press Enter
The response should indicate that the service is ready and that there are no blockages. Any blockages will have to be removed. The cause is often related to anti-virus or firewall software.
Creating an SMTP Domain #
Next you need to create an email domain for the demonstration system. An SMTP domain can be created as follows:
- In Internet Information Services (IIS) 6.0 Manager, expand the SMTP Virtual server node. Right-click Domains and select New -> Domain
- In the New SMTP Domain Wizard, select Remote and click Next
- Give the new domain the name codelessplatforms.com
- Click Finish to create the new domain
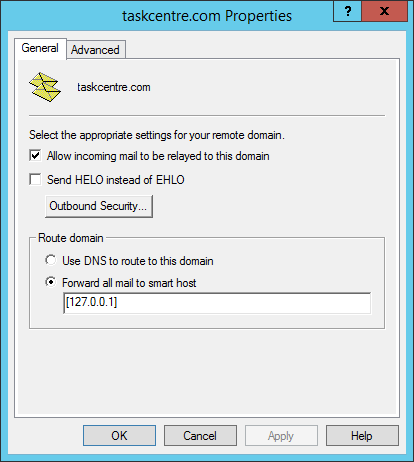
The new domain is now listed in the Manager. The domain properties will now need to be configured as follows:
- Right-click the codelessplatforms.com domain and select Properties
- Within the General tab of the dialog select the option Allow incoming mail to be relayed to this domain
- Select Forward all mail to smart host and enter [127.0.0.1]
- Click OK to accept your settings
Downloading the Mail Server #
With a standalone system, it isn’t possible to connect to a corporate mail server. If you are training or demonstrating BPA Platform from such a machine, you will want to have access to a mail server in order to demonstrate email features.
In these circumstances, we recommend an application called ArGoSoft Mail Server. This is a small, free mail server, which you can use to show users how the BPA Platform server works with an SMTP mail server.
You can download the ArGoSoft Mail Server installer from this web link: https://www.argosoft.com/RootPages/Download
Otherwise you can find a download page from your search engine. There are various versions of the product, but the freeware version is adequate for our purposes.
Installing the Mail Server #
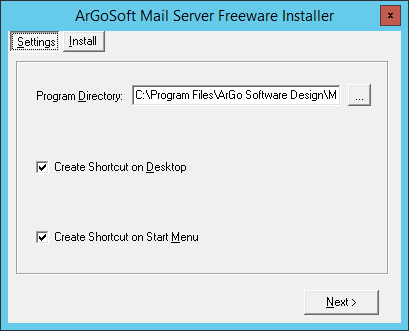
To install the ArGoSoft Mail Server, you run the executable, confirm the installation folder location then select the Install button and let the installer run.
Turning on Mail Relay #
After installing ArGoSoft Mail Server and starting the application, you’ll initially see a message that mail relay is currently switched off. Mail relay should be enabled so that BPA Platform hands its SMTP output to a receiving mail server in the last hop.
It’s important to understand, however that damage may result from enabling mail relay without to due protection to the server, most notably when the machine is connected to the internet. There is no risk if your virtualised machine is not connected to the internet.
To enable mail relay, take the following steps:
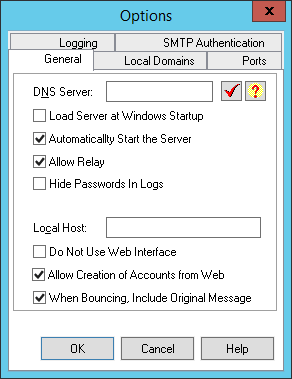
- Right-click the ArGoSoft Mail Server icon in the system notification tray and select Show
- Click the Options button (a yellow cog-wheel icon) to open the Options dialog.
- Select the General tab
- Tick the Allow Relay check box
Entering the DNS Server IP address #
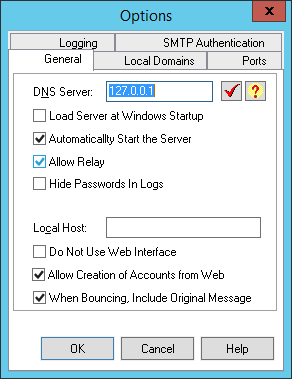
Next you need to set the DNS Server IP address which will be the IP address of the Local Host.
- Still within the General tab change the DNS Server IP address to 127.0.0.1.
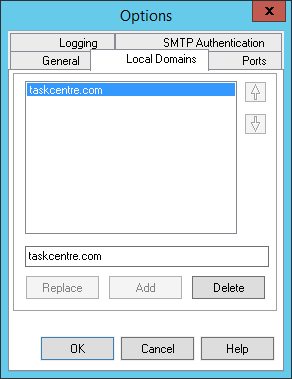
Adding a Local Domain #
Next you need to add the domain name that you intend to use on the demo machine.
We recommend setting this identifier to ‘codelessplatforms.com’.
- Select the Local Domains tab and type codelessplatforms.com in to the text box and click the Add button.
Configure the Ports #
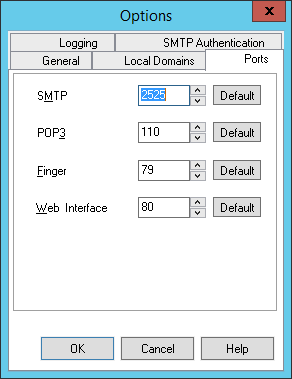
The inbound port to receive mail now needs to be changed so that it does not conflict with the same inbound port number of IIS.
- Within the Ports tab change the SMTP port to 2525.
- You click OK to accept your settings and close the options dialog box.
Adding a New User #
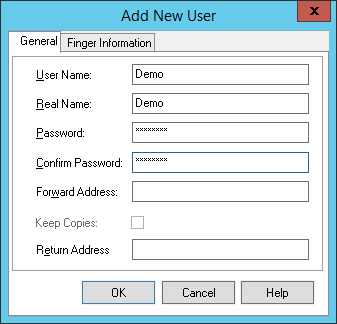
A user is required by the mail server which will be used to create a demonstration recipient for receiving mail from BPA Platform.
- Click the Users button

- In the User Setup dialog click the Add New User button

- Within the Add New User dialog you need to enter a name and password of choice for the demo user. It is not necessary to enter a ‘forward’ or ‘return’ address.
For example, User name: Demo / Real name: Demo / Password: password - Click OK to accept your settings.
You now have an SMTP mail server running on the local machine responding on SMTP port 2525 and POP3 port 110. One user with the email address ‘[email protected]’ is also available for use by the mail client.
Closing the ArGoSoft Mail Server window sends the application into the system tray, where it waits for email to arrive. It has the process name of mail server.exe and runs as an application not as a service.
Adding a New Email Account #
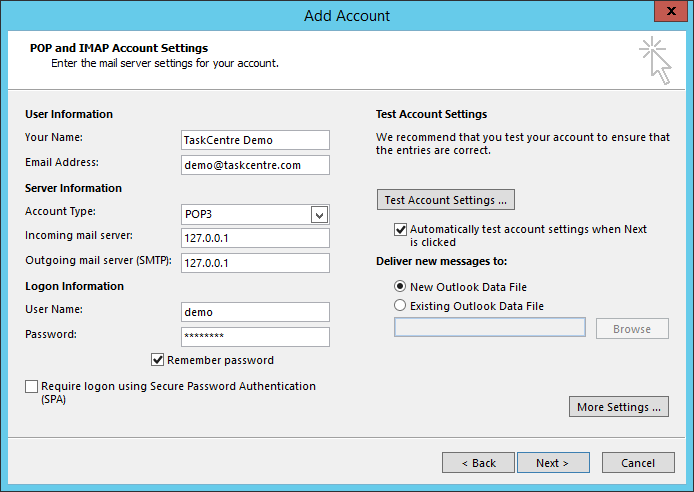
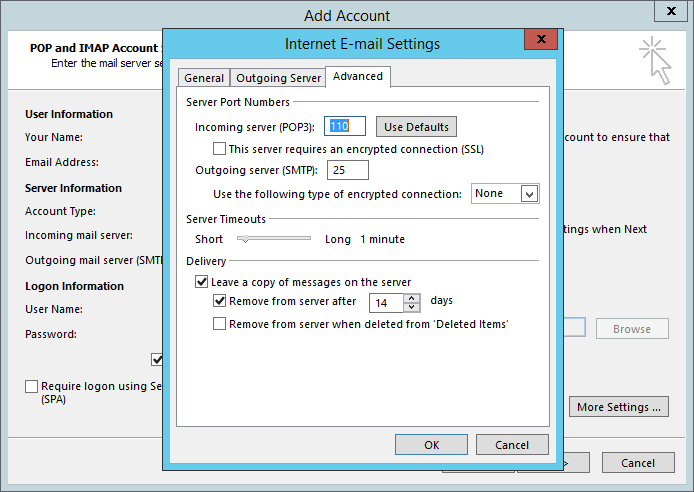
You now need to configure the mail client to setup an account. In our example we are using Microsoft Outlook 2013.
Launch the email client and add a new email account with the following details; as shown in figure 12
- Profile name: BPA Platform Demo
- Email Address: [email protected] [or enter the address of the demo user you created]
- Account Type: POP3
- Incoming mail POP3: 127.0.0.1
- Outgoing mail SMTP: 127.0.0.1
- User Name: demo
- Password: password
- Ensure any advanced settings are set so that the Incoming server (POP3) port has been set to port 110 and the ‘Outgoing server’ port has been set to port 25.
In Outlook these settings can be accessed by clicking the More settings button when creating the account; as shown in figure 13.
Installing and Configuring the Demonstration machine #
Introduction #
Having prepared and configured the supporting infrastructure and software for your standalone demonstration system, you can go ahead and install the BPA Platform product on the demonstration machine.
Installing the BPA Platform Components #
To install the product, you run the setup.exe for the BPA Platform installer. This will open the installation wizard which will guide you through the install process.
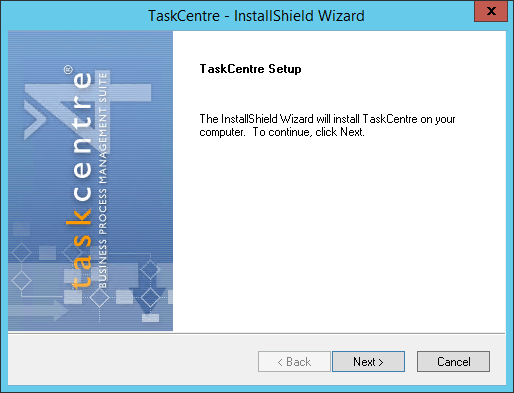
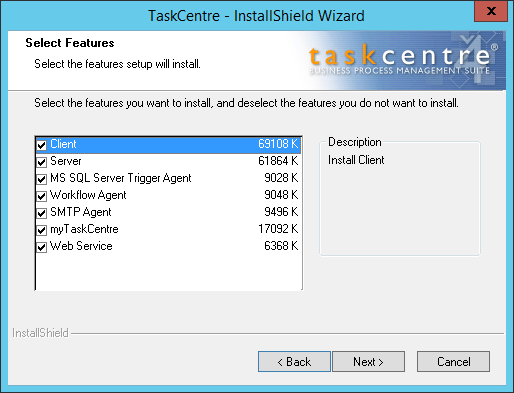
You will be required to enter your product key and select the features of BPA Platform that you wish to install.
On completion you are given the choice to open the Configurator to proceed with configuration of the product.
Configuring the Installed Components #
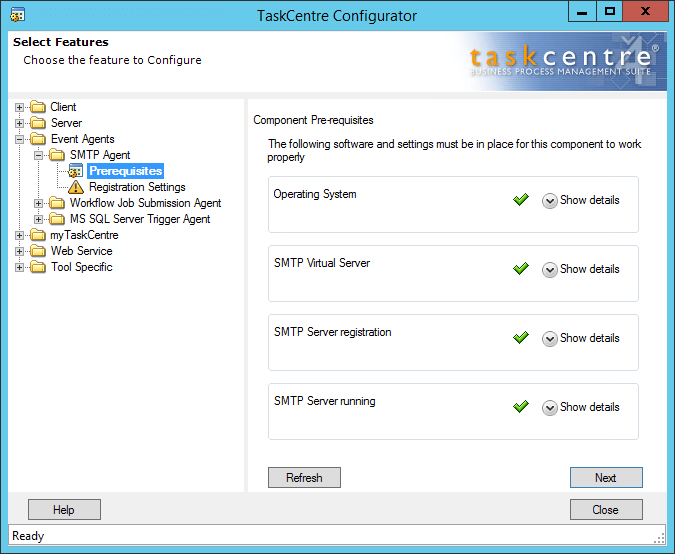
The Configurator displays the installed components. It checks and reports on the prerequisite software and the suitability of the environment for them, leaving the user to make necessary adjustments.
For a detailed description of the configuration of the main components refer to;
Installing and Configuring the Server
Installing and configuring the Email Trigger (SMTP) agent
Installing and configuring the Microsoft SQL Server Trigger agent
Installing and configuring the Workflow Components
Installing Tool Packs #
Once you have configured the installed features you may want to install and configure any additional tool packs that you may need for your demonstration system.
Click here for more information on Installing tool packs
Creating a Demonstration System: In Summary #
BPA Platform is normally deployed across a network, the BPA Platform server uses agents to communicate with other servers and perform event driven tasks.
On occasion, when full-scale deployment may be impossible, the product may have to be installed on a single machine for such purposes as product demonstration or field training. It’s then best to use a virtual machine running a server operating system, to allow more features to be demonstrated.
Before installing BPA Platform, a supporting infrastructure should be put in place. This includes the virtual machine, third-party applications with which BPA Platform will work, the SMTP Virtual Server under IIS, an SMTP mail server such as ArGoSoft’s and an email client such as Outlook.
The BPA Platform product can then be installed and configured on the standalone machine.