Introduction #
In order for the Email Trigger (SMTP) Agent to receive incoming emails, the SMTP Virtual Server (available as part of IIS version 6.0) must be installed. Unfortunately, later versions of IIS (from Windows Server 2008 onwards) do not have SMTP functionality as standard. But they do allow IIS 6.0 to be installed and used in compatibility mode. For such configurations, IIS 6.0 will be used only for SMTP functionality, leaving the integrated IIS version for all other web functions.
This article provides a detailed description of how to setup the SMTP Virtual Server.
Installing the Windows SMTP Virtual Server #
You install the SMTP Virtual Server on the same machine running the TaskCentre Server. (Note that this is also the same server where the Email Trigger (SMTP) Agent is installed.)
- Launch the Server Manager.
- Go to Manage > Add Roles and Features.
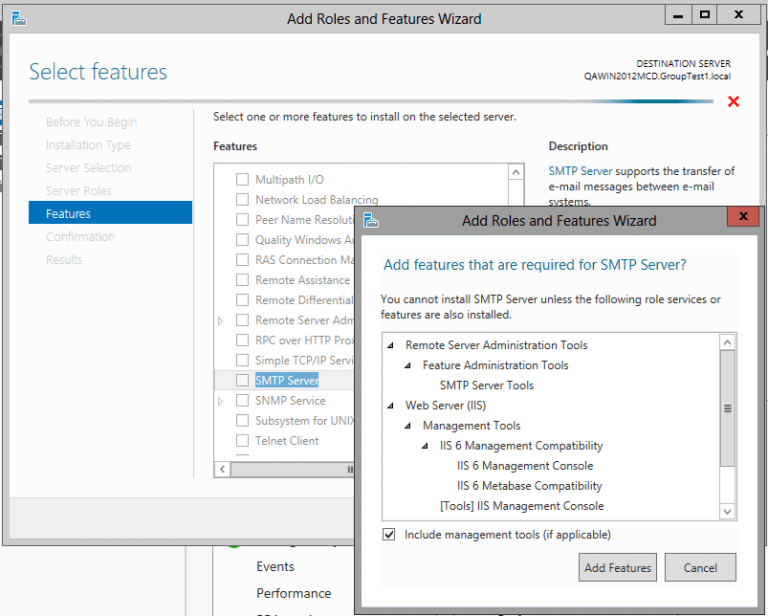
- From the Add Roles and Feature Wizard, click Next until you reach the Select feature view.
- Select SMTP Server.
- From the Add Features that are required for SMTP Server? dialog, ensure Include management tools (if applicable) is selected.
This ensures IIS 6.0 is also installed.

Click Add Features. - Click Next, accepting all default values, then click Install.
- Click Close when the installation has finished.
Adding an Alias Domain #
SMTP domains are used for organising emails for delivery. Alias domains are an additional mail route object for your main SMTP domain. Emails received for the alias domain are stored separately for processing.
For example, if your main domain is mydomain.local, but taskcentre.local also needs processing, you would need to create an alias domain.
As part of the setup in your Exchange server, you must create an email contact for the Email Trigger (SMTP) Agent. The domain you specify must be created as an alias domain in the SMTP Virtual Server, else the incoming emails will remain in the server’s queue.
- Launch IIS 6.0 Manager
- By default, the SMTP service doesn’t automatically start.
Start the service.
- From the left-hand panel, expand SMTP Virtual Server #1.
- Right-click Domain, then New > Domain.
- Specify the domain Type as Alias.
- Enter the relevant alias domain Name, then click Finish.
Configure the SMTP Virtual Server to Accept Incoming Traffic #
- Right-click SMTP Virtual Server #1
- Select Properties.

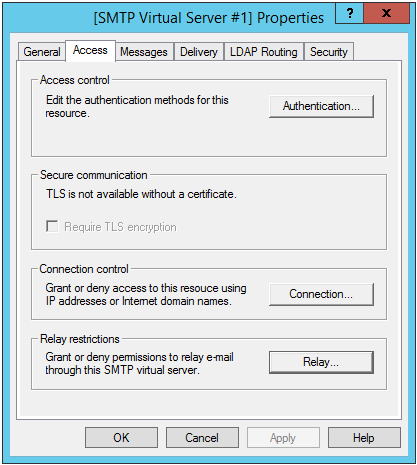
- From the Access tab, click Authentication.
- Select and configure the appropriate authentication method for your organisation.
Now, we lock down access to the SMTP Virtual Server. - Back in the Access tab, click Connection.
- Select Only the list below, and click Add.
- Enter your Exchange Server’s IP address, and click OK.
- Back in the Access tab, click Relay.
- Select Only the list below, and click Add.
- Select Single computer, and enter the Exchange Server’s IP address.
- Click OK until you return to the IIS 6.0 Manager screen.
What’s Next? #
- Configure your mail server to forward emails to the Email Trigger (SMTP) Agent
Our knowledge base articles, Forward Mail to the Email Trigger (SMTP) Event Agent - Exchange 2010 and Forward Mail to the Email Trigger (SMTP) Agent - Exchange 2016, provide example descriptions of how to set this up on Microsoft Exchange 2010 and 2016 - Installing and Configuring the Email Trigger (SMTP) Agent

