REST Web Service Connections #
What is a REST Web Service? #
As an alternative to using SOAP standards and protocols, web services can be based on REST design.
Unlike SOAP, REST is not a standard. It is a set of guiding principles for designing software architecture for networked systems, in particular the web, as a platform for distributed computing.
REST principles focus on system resources and resource states and how resources are transferred over HTTP. REST stands for representational State Transfer.
REST is an attempt to simplify Web services. It aims to avoid the complexity of multiple standards and to be less tied to proprietary middleware than SOAP or WSDL services.
Many common web services are now REST based, including various booksellers, information providers and much else.
Download Web Service Connector Tool Whitepaper
REST Web Service Configuration #
One of the TaskCentre administrator’s responsibilities is the global configuration of connections, to make them available for task designers. This includes the configuration of web service connections.
You use the Web Service Connector tool to configure web services in TaskCentre. You can use it for both SOAP and REST web services. The tool’s global configuration is accessed in the Execute tool group.
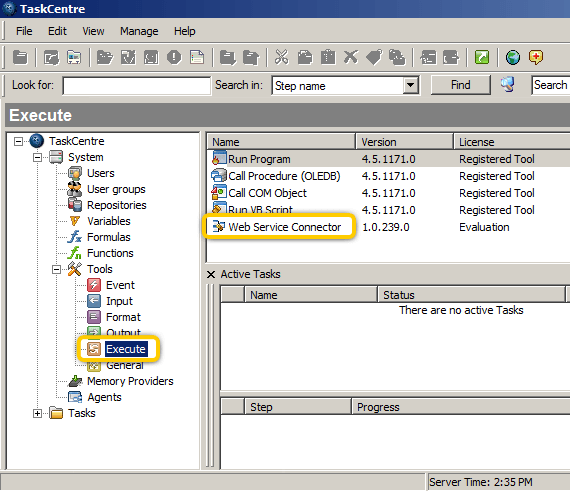
Above: You can see the Web Service Connector tool listed in the pane on the right. To continue with the configuration, you double click the Web Service Connector name.
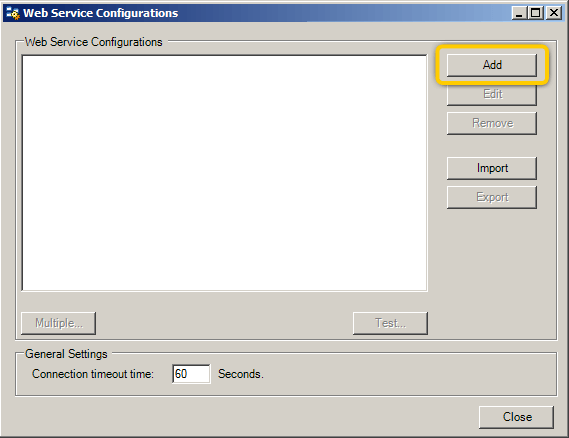
Above: The Web Service Configurations dialog box lists any web services already configured and allows you to edit or remove them. It also allows you to add new web service configurations.
Clicking the add button opens the New Configuration dialog box.
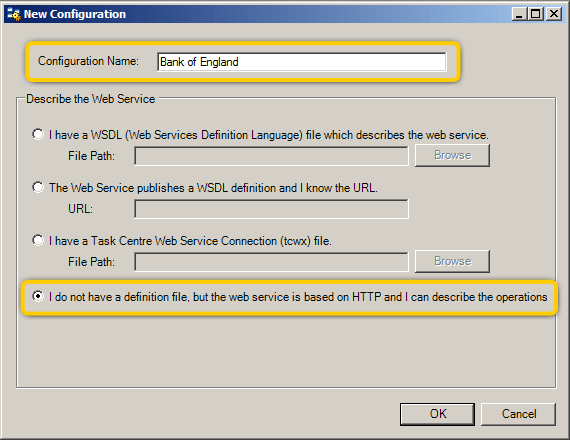
Above: The new configuration dialog box allows you to set a name and then select the web service description option that suits your connection architecture or standard.
For REST, which uses HTTP to pass requests to the web server and does not normally make use of WSDL or other definition files, you select the option for describing the operations based on HTTP methods.
The REST service we are configuring provides a central bank currency rate conversion service. So we have entered “Bank of England” here as the new configuration name.
We then select the appropriate description option for REST. In this example we have selected the option ‘I do not have a definition file… I can describe the options’
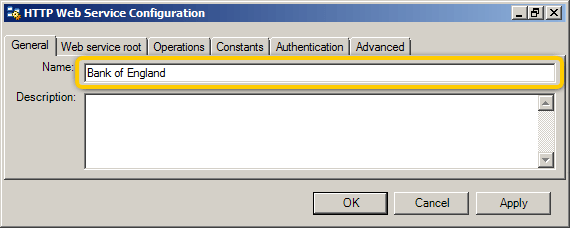
Above: The HTTP Web Service Configuration dialog box, appropriate for REST services, opens. It consists of six tabbed pages.
Download Web Service Connector Tool Whitepaper
The General tabbed page contains the name of the newly added configuration and provides a text area where you can add your own description of the service if you so choose.
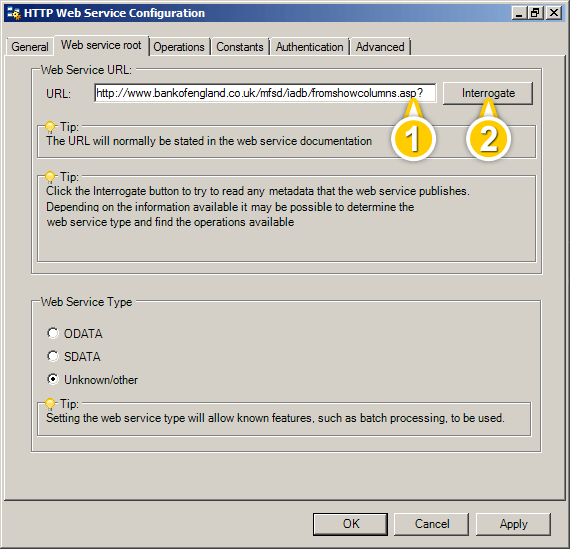
Above: The next tab is Web service root tab.
The Web service root tabbed page contains settings for specifying the web service URL and the web service type. You can obtain this either by interrogating the web service or by looking in the web service documentation. Currently available web service types include ODATA, GDATA and SDATA; there’s also an option for unknown or other types.
1- Here you enter the appropriate URL for the REST service you want to connect to. For this example, we have obtained a URL for the currency rate conversion service and entered part of it in the URL field.
When configuring REST connections, it is important to understand the structure of the URL.
Click here for some background information on the Bank of England web service.
2 – Having entered the URL, you can try interrogating the service, using the Interrogate button.
If the interrogation can successfully read back operations, the correct web service type will be automatically selected on this tabbed page and the operation details will be automatically selected and displayed where relevant in the other tabbed pages of this dialog box.
If the interrogation cannot read the operations, you will have to describe them manually, as we will do in the following example.
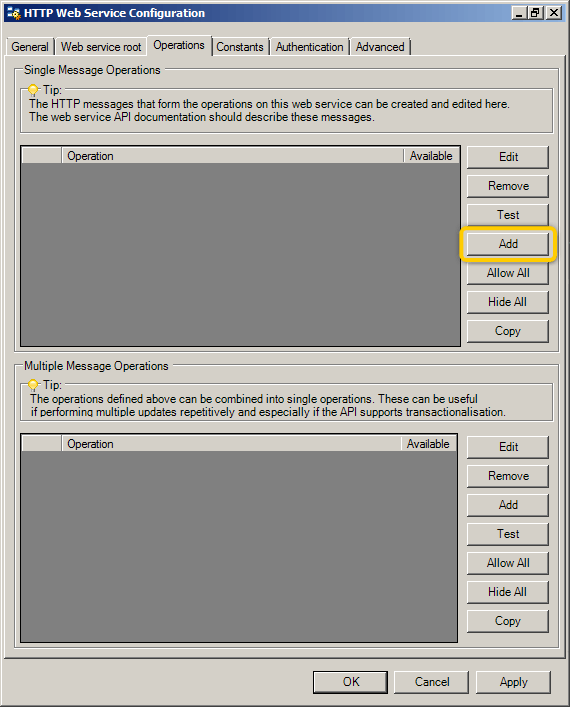
Above: We will now move on to the operations Tab.
Download Web Service Connector Tool Whitepaper
The Operations tabbed page lets you create, edit and remove the HTTP messages that make up the operations of the web service, using four HTTP methods – GET, POST, PUT and DELETE.
The available HTTP messages are usually described in the API documentation for the web service.
In this example we are going to add an operation to retrieve currency rate information from the Bank of England web service.
Clicking the Add button in the Single Message Operations area opens the New HTTP Operation dialog box.
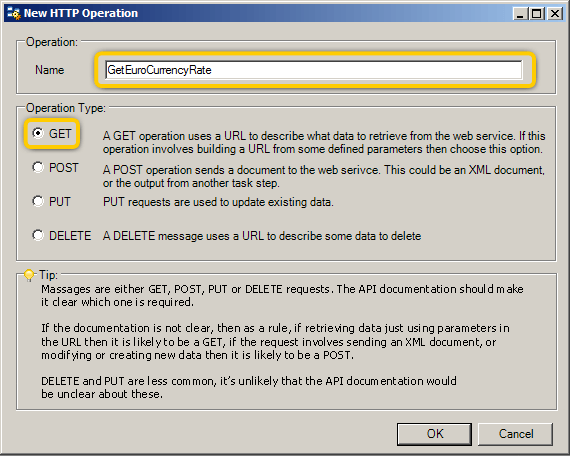
Above: The New HTTP Operation dialog box lets you give the new operation a name and select the required HTTP operation from the four available methods. For this example, we’re using a GET operation to retrieve the currency information from the web service.
We have entered a name for the HTTP operation we are configuring – ‘GetEuroCurrencyRate’ and now need to define this operation.
Clicking OK saves this new operation,we can now start setting up its definition.
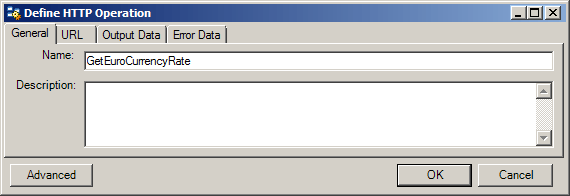
Above: The Define HTTP Operation dialog box contains four tabbed pages. The opening tabbed page displays the name of the new operation and provides space for a description if desired.
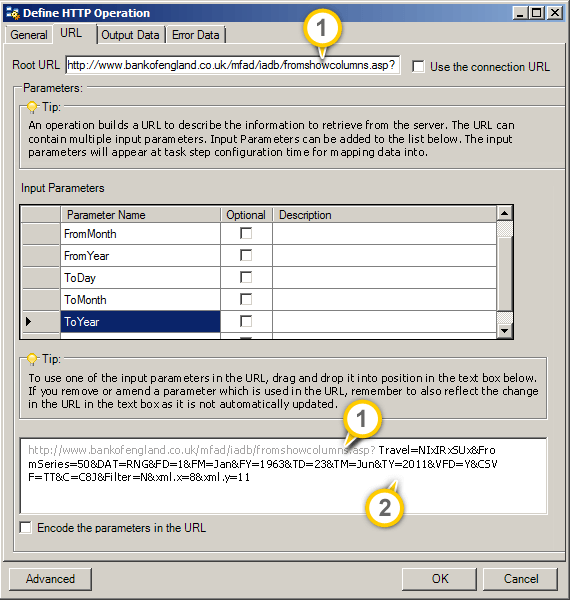
Above: We will now select the URL tab. This tab lets you build up the required URL by entering and editing parameters for the HTTP operation. You may need to refer again to the background information about the structure of the URL.
1- We have entered the root of the URL provided by the web service at the top. This is all the text up to and including “.asp?”
Notice that the same root is repeated in greyed text in the text box at the bottom.
Clicking OK accepts the settings in order to continue the configuration.
The next step is to define the operation. This builds the query string for a URL, describing the information to retrieve from the server.
2- The easiest way to start building the query is to paste the query string component of the URL, shown here, into the text box, placing it straight after the root, where you can then edit it.

Above: The full URL, including the query component, is now pasted into the text box at the bottom. We will shortly need to edit this URL, so that it includes exactly the parameter fields and values that are required.
Before this, we will enter the parameter names in the Input Parameters table. You can find the available names in the web service documentation and populate the list with the relevant parameter names.

Above: Since we require the web service to report currency rates over set periods, here we have typed in six input parameter names that we require. We got these from the web service documentation.
The next step is to identify where these names should be placed in the URL query string.

Above: Look again at the query string. A query string consists of a set of field–value pairs. The field and the value are separated by an “=“ sign. Each field–value pair is separated from others by an “&” sign.
Note that the syntax may vary from service to service. For example, some services use “EQ” instead of “=“. The documentation for the service will provide the details about the syntax.
The highlight above indicates one field–value pair: TM=Jun. In this, the field is “TM” and the value is “Jun”. For each of the parameter names we entered in the list, we can identify a corresponding field–value pair in the query string. For instance, the “ToMonth” name in the list name corresponds to “TM=Jun” in the string. What we now have to do is replace the actual value in each pair with the relevant parameter name. For example, we replace “Jun” with the parameter name “ToMonth”.

Above: The tool makes it easy to do this: you drag the parameter name from the table and drop it in position in the query string where the value is. Be sure to delete the value Itself (e.g. Jun)

Above: Here you can see that “Jun” is now replaced with “ToMonth”. The curly brackets are added automatically when you drop the name in place

Above: You will need to repeat the drag-and-drop action for each of the parameters you want to include in your operation definition.
You can see that we have done this for each of the parameters we entered in our list. The HTTP operation has now been defined.

Above: We will now look at the Output Data tab.
The Output Data tabbed page lets you specify whether output is required for this web service and to identify the type of output. This information is derived from the web service documentation.
1- For this example, output data is available and is returned as XML therefore we have selected the Output required check box.
2- The other settings on this tabbed page are now enabled.
We have left the Output type option at the default XML or JSON setting.
The Document setting is only selected when the output data is provided in one of a range of file-based formats.
3- The Document area of this tabbed page contains two tabs:
- Schema, where you can configure schema settings
- XML Preview, which shows XML output from a step using this operation
For the output data to be available to subsequent steps in the task, the XML or JSON schema needs to be known.
4 – You can retrieve it by sending a test message to the web service, using the Send test message button.
5 – The response to this test will be displayed in the text box.
6 – Once the data is present, the schema can be inferred from it using the Infer schema from XML or JSON button, which will be enabled.
7 – Alternatively, if a schema file is provided by the service, you can browse to it using the Browse to XSD/XML file button; then paste the XML or JSON data into the text box.
There are also options to validate the schema and to incorporate any additional schemas that are referred to by it.
We will click the Send test message button (4 – above) to retrieve the XML from this operation.

Above: The Test Web Service Configuration dialog box opens.
Here you can ensure that the relevant operation is selected, enter values for its parameters and then run the test.
1 – We have entered some values for parameters we included when building the GetEuroCurrencyRate operation.
2 – Clicking the Test Button displays the results in the results box, where they can be checked for errors.
Download Web Service Connector Tool Whitepaper
Let’s return to the Output Data page.

Above: You can see that the XML returned by the test is now also displayed in the text box in the Schema area. From this, it is possible to infer the schema and edit it (using the Infer schema from XML or JSON button) and to validate the schema (using the Validate Schema button).

Above: The operation we have defined, GetEuroCurrencyRate, is now displayed in the list of defined operations. From here, we can again run a test, to check that the operation is correctly set up.

Above: The same Test Web Service Configuration dialog box opens as before, where you select the operation to test, enter values for its parameters and run the test.
Here we have again entered values for the input parameters and run the test. However, it is not necessary to run this test at this stage if you have successfully run it when configuring the Output Data.
Click OK to accept all your settings and close the HTTP Web Service Configuration dialog box.

Above: The newly created REST web service is now displayed in the list of available web service configurations.
REST Web Service connections: In summary #
Among the global configuration done by the TaskCentre administrator is that for web service connections. REST and SOAP services are supported. Unlike SOAP, REST is not a standard, but a set of design principles, based on HTTP and XML standards.
REST uses URLs to locate resources, HTTP methods to query servers and XML as the common language between platforms or applications.
Four HTTP operations are used – POST, GET, PUT and DELETE, to create, retrieve, update and remove resources, respectively.
REST configuration is done using the Web Service Connector tool. You can add new service configurations, test, edit or delete them. You can enter parameters for selected operations, specify and test the output format, which can be XML, JSON or document format. In the case of XML and JSON, you can retrieve or infer the schema, which must be known for the output data to be usable by subsequent task steps.
Return to TaskCentre Administration
