Introduction
The Web Service Connector Tool can be used to automate calls to the REST Web Service API exposed by Zendesk. This allows you to integrate the creation and management of support tickets and related objects into your workflow. Full documentation of all of the operations provided by this API can be found at http://developer.zendesk.com/documentation/rest_api/introduction.html.
Sample HTTP request
Below is a valid HTTP request that could be sent to the Zendesk web service by the Web Service Connector Tool. The request would update the support ticket number 31 with the details given in the JSON object. The parts in bold type require configuration and are accompanied by reference tags to indicate which of the configuration steps below are involved in generating that part of the request. The parts in regular type are generated automatically and require no configuration.
PUT[1] https://orbissoftwareltd.zendesk.com/api/v2/tickets/31.json[2] HTTP/1.1

Content-Type: application/json[3]

Accept: application/json[3]

Authorization: Basic dHdAb3JiaXMtc29mdHdhcmUuY29tOnBhc3N3b3Jk[4]

Host: orbissoftwareltd.zendesk.com

Content-Length: 147

Expect: 100-continue

{"ticket":{"subject":"Web Service Connector Tool","description":"How do I connect to the Zendesk web service?","tags":["web","service","zendesk"]}}[5]
Sample HTTP response
Similarly, below is a valid HTTP response that could be received by the Web Service Connector Tool from the Zendesk web service. The response gives details of the support ticket number 31 in response to a GET request. In order to use the response and make its data available to subsequent task steps, the Web Service Connector Tool requires a schema describing the format of the expected JSON response from each operation, which it can infer from an example response such as those provided in the API documentation (see the configuration step marked with reference tag [6]).
HTTP/1.1 200 OK

Server: nginx/1.0.15

Date: Tue, 12 Feb 2013 09:56:37 GMT

Content-Type: application/json; charset=utf-8

Connection: keep-alive

Status: 200 OK

X-Zendesk-API-Version: v2

X-Runtime: 61

ETag: "bd55126fbce595129312ae2d0ae82b32"

Cache-Control: private, max-age=0, must-revalidate

Content-Length: 716

X-Zendesk-Origin-Server: app33.sys.zendesk.com

X-Zendesk-User-Id: 334473887

X-Content-Type-Options: nosniff

{"ticket":{"url":"https://orbissoftwareltd.zendesk.com/api/v2/tickets/31.json","id":31,"external_id":null,"via":{"channel":"api","source":{"from":{},"to":{},"rel":null}},"created_at":"2013-02-12T09:56:33Z","updated_at":"2013-02-12T09:56:36Z","type":null,"subject":"Web Service Connector Tool","description":"How does it work?","priority":null,"status":"open","recipient":null,"requester_id":334473887,"submitter_id":334473887,"assignee_id":334473887,"organization_id":24074457,"group_id":20587697,"collaborator_ids":[],"forum_topic_id":null,"problem_id":null,"has_incidents":false,"due_at":null,"tags":["web","service","zendesk"],"custom_fields":[],"satisfaction_rating":null,"sharing_agreement_ids":[],"fields":[]}}
Getting Started
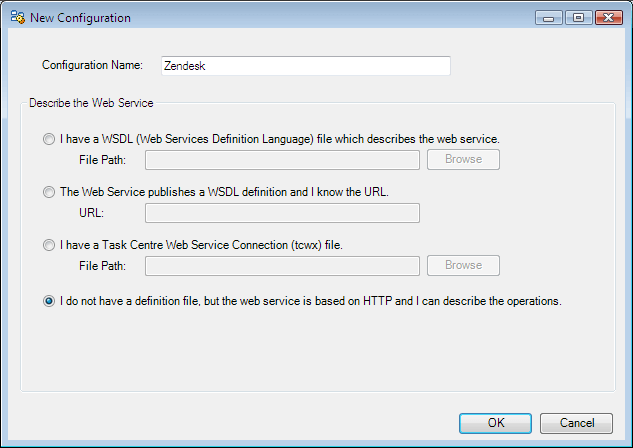
Zendesk’s web services are based on the RESTful principles and are not designed around the SOAP standard, meaning it is necessary to “describe” to the Web Service Connector Tool those operations exposed by the service that you wish to use. Begin by creating a new configuration within the Web Service Connector Tool’s global settings, specifying that the service is based on HTTP:
Setting the root URL[2]
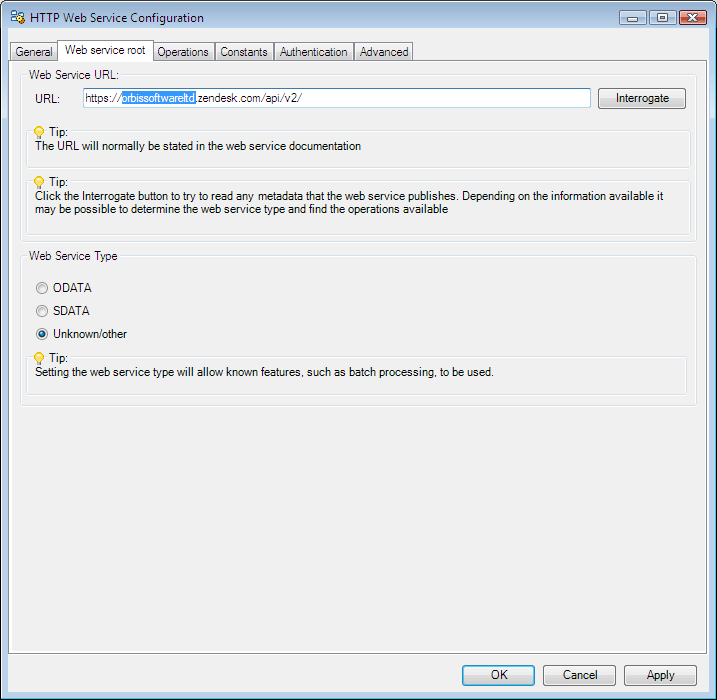
The web service API will be exposed by your particular Zendesk instance at the URL https://YOURACCOUNTNAME.zendesk.com/api/v2/, where YOURACCOUNTNAME is the name you have given to your organisation’s Zendesk instance. This URL should be specified as the web service root URL:
Authentication[4]
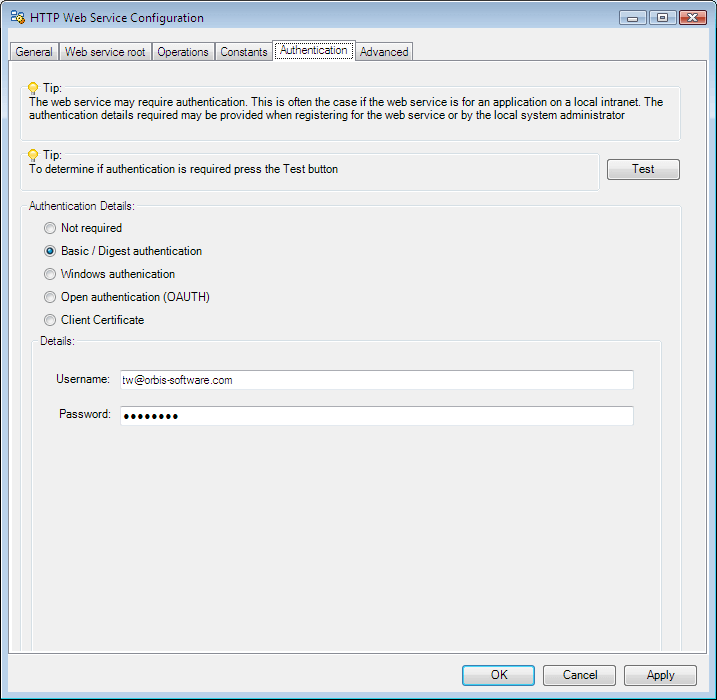
The Zendesk web service uses basic authentication, which requires you to enter your Zendesk username and password on the Authentication tab:
Describing Your Operations
As can be seen from the Zendesk REST API documentation, there are a large number of operations available for use. However, it is only necessary to configure within the Web Service Connector Tool those operations that you actually wish to use. In the screenshot below, the user only requires those operations relating to the creation and manipulation of support tickets, and has thus configured these within the tool: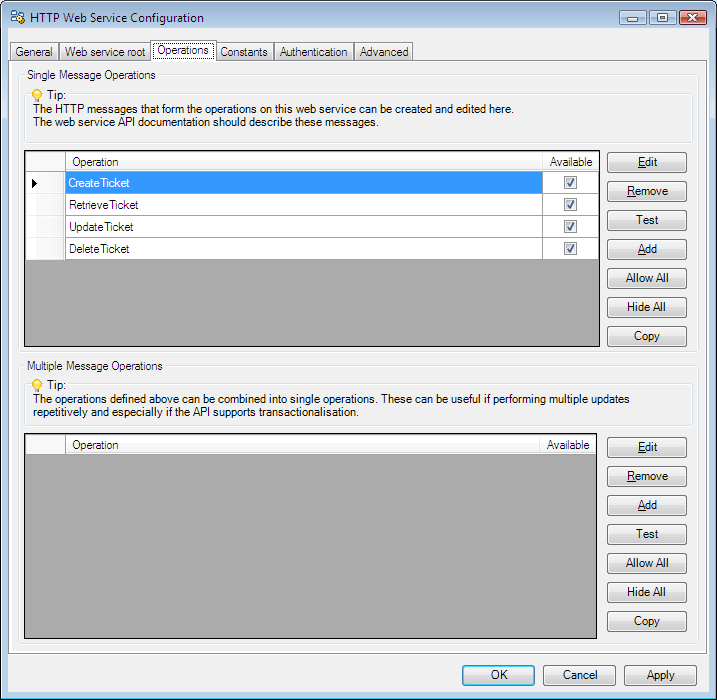
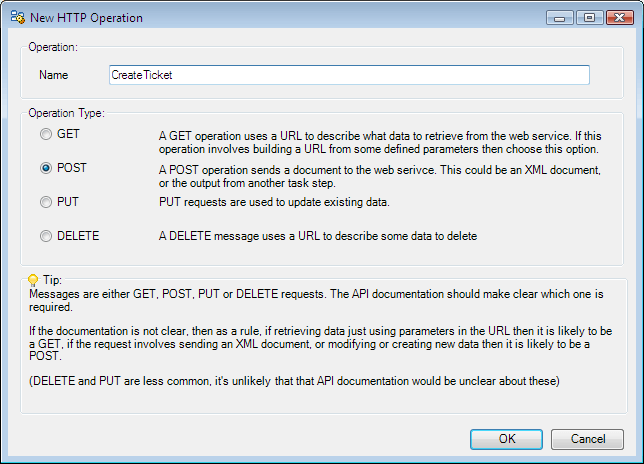
Selecting the operation type[1]
Clicking the Add button in the upper “Single Message Operations” pane brings up the dialog box seen below and begins the process of defining one of the operations listed in the REST API documentation. The most important choice to be made here is the operation type. The correct operation type is stated explicitly in the documentation; for example, the “Creating Tickets” operation seen on this page states that its command is POST /api/v2/tickets.json, indicating that the correct choice of operation type is POST.
Setting the operation’s URL[2]
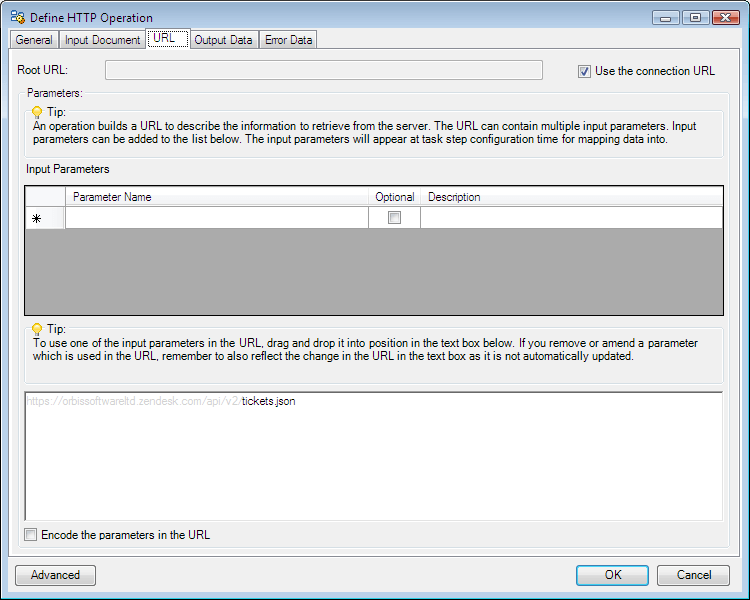
Once you have selected the operation type you will be taken to the dialog box shown below in which you define the operation’s URL as well as its input and output data. The base part of each operation’s URL is the same as the connection URL that you set previously, i.e. https://YOURACCOUNTNAME.zendesk.com/api/v2/, so tick the “Use the connection URL” check box in order to pre-populate the large text box at the bottom of the screen with this base URL. The final part of the operation’s URL can be gleaned from the command shown in the documentation as seen in the previous step; for the “Creating Tickets” operation, the command is POST /api/v2/tickets.json, indicating that “tickets.json” should be added to the final URL for the operation, as seen below.
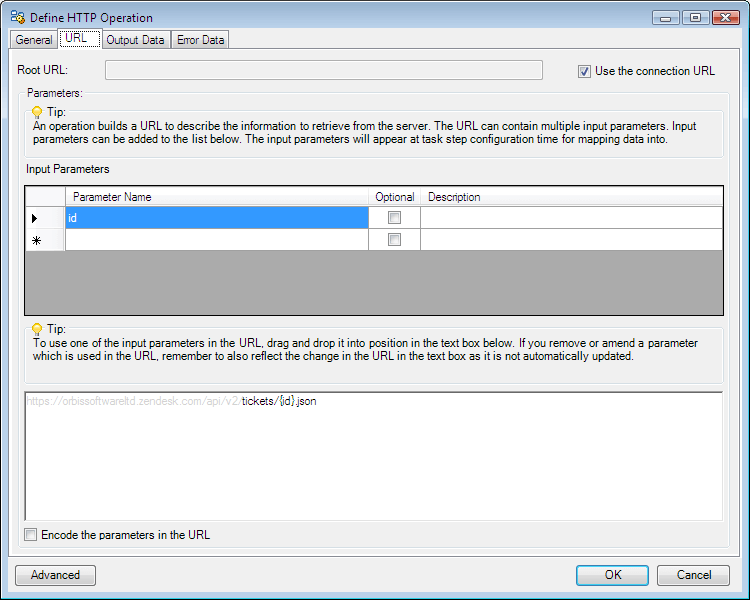
Some operations contain variable parts that indicate which object in the system is being acted upon. For example, in the screenshot below, the “Getting Tickets” operation takes an ID parameter indicating which ticket should be retrieved from the system; its command is given in the documentation as GET /api/v2/tickets/{id}.json. The ID parameter needs to be specified in the list of input parameters in the centre pane of the screen, and then referenced in the URL by placing its name within curly braces, as seen below.
Setting additional request headers[3]
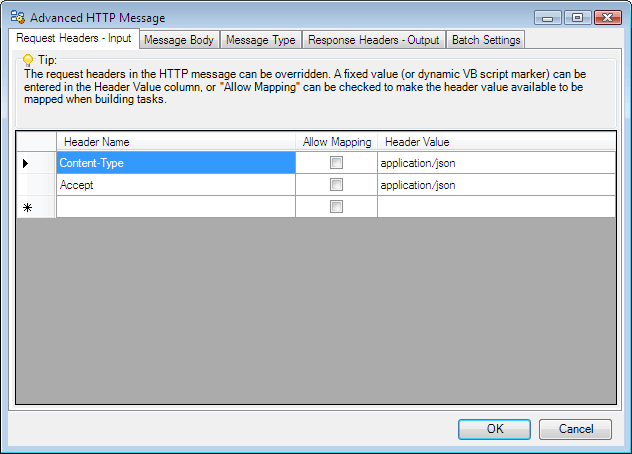
The Zendesk web service requires some additional parameters to be configured in order for the transmitted objects to be correctly interpreted. Clicking the Advanced button on the “Define HTTP Operation” dialog window brings up the “Advanced HTTP Message” dialog window shown below. On the “Request Headers – Input” tab, you must specify the HTTP header “Accept” with the value “application/json” for all operations that you define, and you must additionally specify the HTTP header “Content-Type” with the value “application/json” for all POST and PUT operations that you define:
Describing the JSON input object to be sent to the service[5]
Many of the web service’s operations, namely those using the POST or PUT commands, require a JSON object to be sent to the server describing the item to be created (for POST operations) or updated (for PUT operations). To determine the format of the required JSON object, you should refer to the REST API documentation; for example, the correct format for a ticket object is displayed in a table near the top of this page.
When describing the object to the Web Service Connector Tool, it is only necessary to include those fields which are either compulsory or which you desire to make available in your Tasks. It is also necessary to describe the object in the format of an XML document; more information about this can be found in the article on sending JSON objects to RESTful Web Service APIs using the Web Service Connector Tool, located at Sending JSON objects to RESTful Web Service APIs.
Describing the JSON output object to be received back from the service[6]
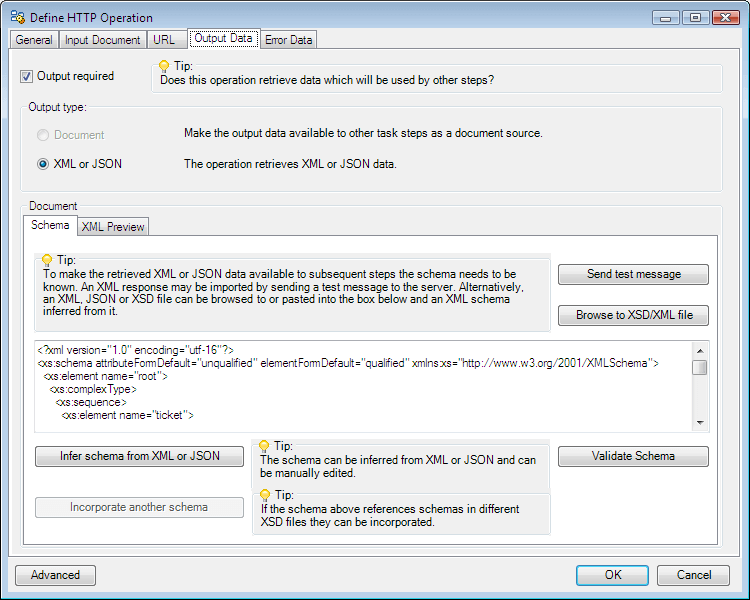
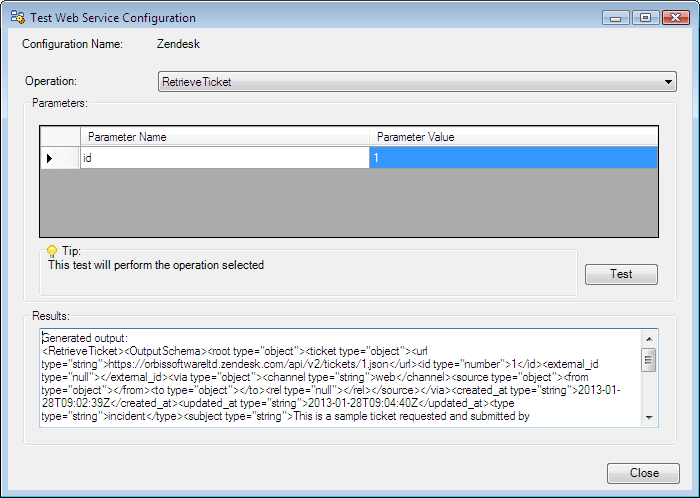
Finally, for operations which return some data to the user, the format of the JSON object returned by the service needs to be inferred by testing the operation. Simply tick the “Output required” box and click on the “Send test message” button, which will bring up the dialog seen below on the right. Enter valid values for the operation’s parameters (if any) and then click on the Test button to run the operation. The output returned by the operation will be displayed in the lower pane in XML format. Close the dialog, and then press the “Infer schema from XML or JSON” button on the original window, followed by the “Validate Schema” button to complete the process.
The operation will now be ready and available for use in Web Service Connector Steps within Tasks.