- Introduction to the Database Query (ODBC) Tool
- ODBC Query Tool Features
- White Paper - Database Query (ODBC)
- Technical Summary
- Adding ODBC Connections
- Step Configuration
Introduction to the Database Query (ODBC) Tool
What is the ODBC Query Tool?
The Database Query (ODBC) tool allows the extraction of specific information sets from relational database systems such as ERP, Financial, Accounting, MRP, Production, CRM, HR, Project, and bespoke systems. Once obtained, the data is then available to other task steps for manipulation or delivery, or both.
The nominated ODBC data source can be local to BPA Platform or on a remote server which is either part of the same network or domain, or, if forming part of a partner-hosted deployment of BPA Platform, external to it with no direct connectivity.
The Database Query (ODBC) tool has comprehensive ODBC support for both modern and legacy platforms supporting both the SQL 89 and SQL 92 and higher ODBC standards.
ODBC Query Tool Features
- Monitors ODBC data sources locally or on a remote server
- Remote Data Relay support
- Support for SQL 89 & 92 and later
- ODBC Direct or ODBC Via DAO
- System, user, and file DSNs
- Forward-only or scrollable cursors
- Catalogues and schemas
- Support for all primary SQL clauses
- System tables, user tables, views
- Inner joins, outer joins, formula joins, Cartesian product
- Formula columns
- Table aliasing
- Flexible pre-built date criteria
- Drag-and-drop visual criteria building with nested parentheses (brackets)
- Common and custom predicates
- SQL free-type mode
White Paper - Database Query (ODBC)
Technical Summary
Working with other Tools
The Database Query (ODBC) tool can directly interact with the following tools:
Consuming from Other Tools
The Database Query (ODBC) tool does not consume objects outputted by any other tool. Instead, it directly queries the database.
Exposing to Other Tools
The Database Query (ODBC) tool exposes objects which can be directly consumed by the following tools:
| Icon | Tool Name | Tool Category |
|---|---|---|
| Convert Recordset to XML | Format | |
| Create Workflow Job | Format | |
| Format as Flat File | Format | |
| Format as HTML | Format | |
| Format as HTML Pro | Format | |
| Format as Text | Format | |
| Run Crystal Report | Format | |
| Run Microsoft Reporting Services | Format | |
| Run Microsoft Word (Merge) | Format | |
| Transform Data | Format | |
| Save File | Output | |
| Transfer File (FTP) | Output | |
| Call COM Object | Execute | |
| Run External Program | Execute | |
| Filter Data | General |
Objects Exposed
The Database Query (ODBC) tool exposes the following objects which can be directly consumed by the above tools:
- Recordset — Tabular data from any BPA Platform tool capable of exposing such data (see above)
- Step Properties — Standard step properties are available allowing you to use statistical data of the tool
Prerequisites
The Database Query (ODBC) tool relies on the following third-party software in order to function correctly:
- ODBC Compliant Data Source
- ODBC driver Level 2.0 Support, ANSI 89, ANSI 92
Adding ODBC Connections
To use the Database Query (ODBC) tool, you must create connections to ODBC data sources first — you do this in
the ODBC Connections interface.
You open this interface from the resources tree — expand System > Tools > Data Connectors or Input, and double click
Database Query (ODBC) in the items list.
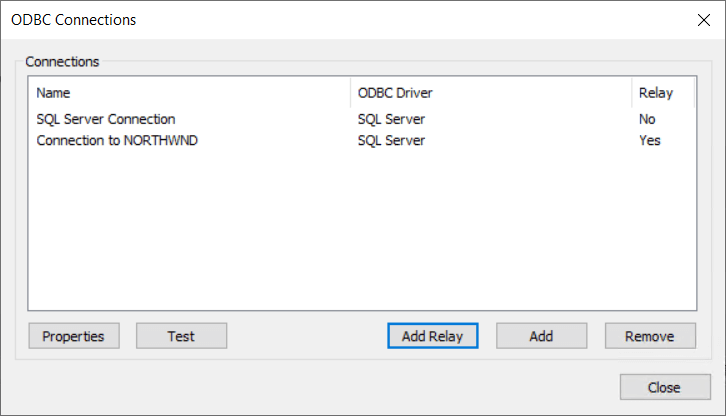
Use Properties to edit an existing connection, Remove to delete an existing connection, and Test to ensure the highlighted connection can be successfully made.
Click Add to create a new connection and select the required ODBC driver or data source.
If you are connecting to a remote ODBC data source where the BPA Platform Server instance has no direct
connectivity to its location (for example, BPA Platform is partner-hosted in the cloud and the data source exists
within a customer’s own network) then you must use Add Relay to create the connection using our Remote Data
Relay. Continue with Creating a Remote Data Relay ODBC Connection.
The differing connection types are denoted in the Relay column to identify where a connection is standard (No) or is
configured to use the Remote Data Relay (Yes).
consult your Codeless Platforms account manager or partner.
Creating a Standard Connection
Create a standard connection if your ODBC data source exists within the same network or domain as your BPA Platform Server instance. This can be local to BPA Platform, or on a separate machine.
Selecting an ODBC Driver
Expanding ODBC Drivers displays all ODBC drivers available on the client machine.
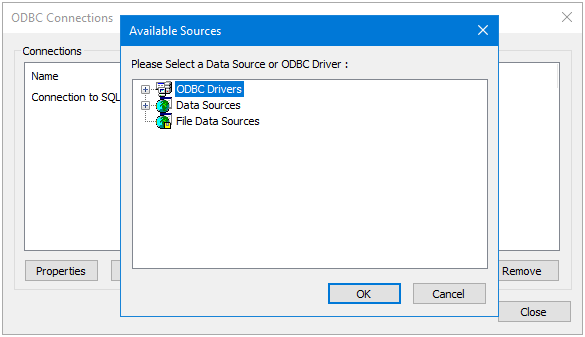
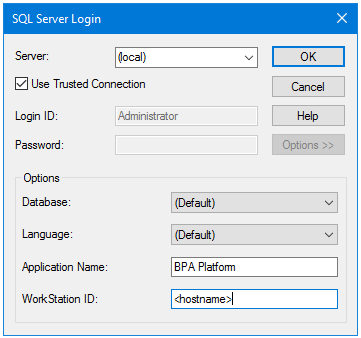
Once a driver has been selected, add the connection details to the database. The configuration window is different for every driver available; the following example is shown when an SQL Server driver has been selected:
Connecting to Data Sources
Expanding Data Sources displays all data sources available on the client machine. If none are available, you must add them to the machine’s ODBC data sources (Control Panel > Administrative Tools > ODBC Data Sources). For more information, refer to your Microsoft documentation.
Connecting to File Data Sources
Expanding File Data Sources displays all data sources available on the client machine. If none are available, you must add them to the machine’s ODBC data sources (Control Panel > Administrative Tools > ODBC Data Sources). For more information, refer to your Microsoft documentation.
Creating a Remote Data Relay ODBC Connection
Create a Remote Data Relay connection if your ODBC data source exists externally to the BPA Platform Server instance and with no direct connectivity. For example, BPA Platform is partner-hosted in the cloud and the customer ODBC data source is within the customer’s own network or domain.
Connecting to an ODBC Data Source using Remote Data Relay
Selecting Add Relay within the ODBC Connections window opens the ODBC Relay Connection Configurator.
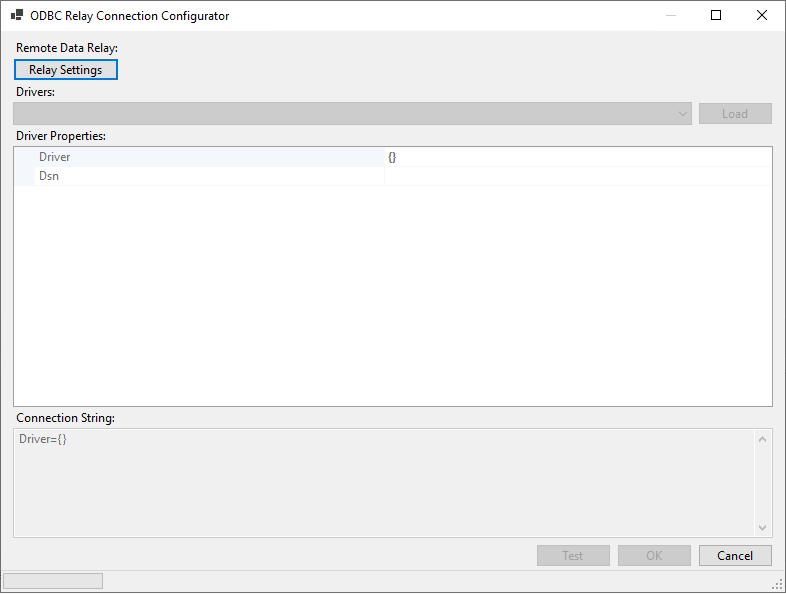
You configure the connection to the Remote Data Relay using the Relay Settings button. Full details on how to configure the relay connection are described in the product help.
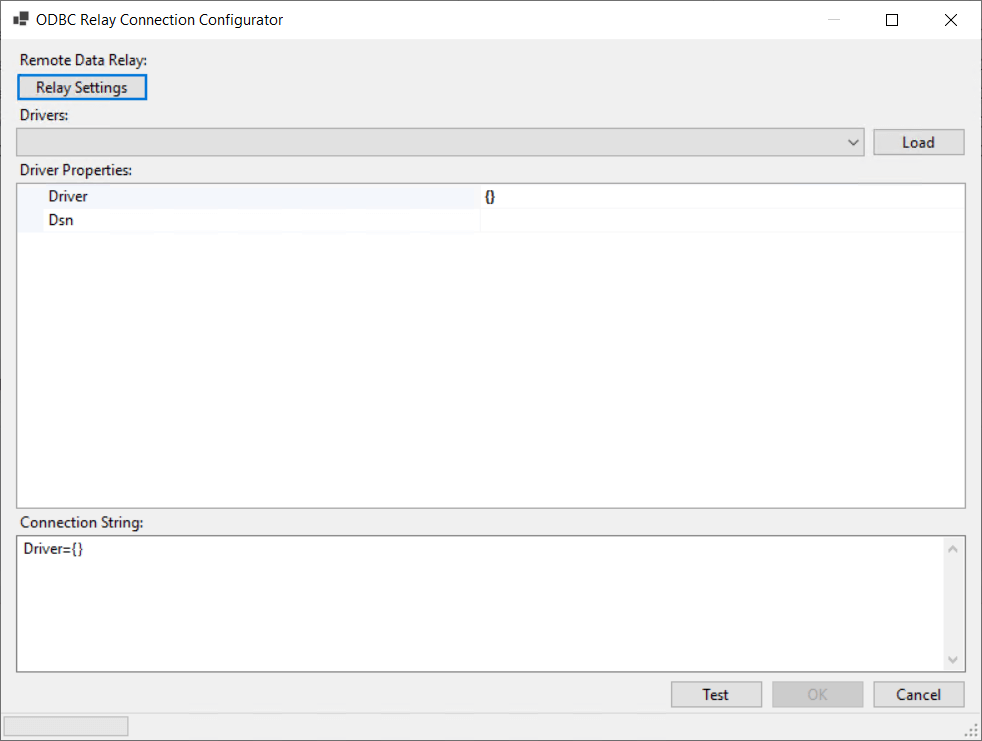
Once a valid Remote Data Relay connection is created, the Load button is enabled. Selecting this will present a list of drivers sourced from the remote machine hosting your ODBC data source.
Choose a driver from the list. If the driver you require is not present, then you need to ensure this is present on the remote machine before Refreshing the Drivers list to display it.
After selecting the driver, enter the Connection String. For commonly used drivers, the list of expected Driver Properties is presented for completion in the grid view. The full string appears in the Connection String box.
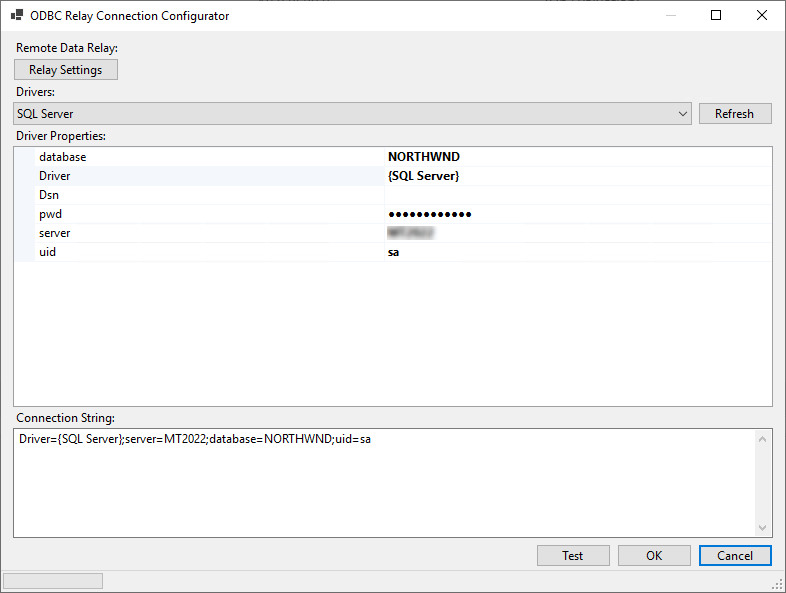
Alternatively, paste a pre-configured Connection String in the corresponding text box. This will automatically create the properties and their values in the Driver Properties grid view.
Further properties can be manually added to the Connection String or removed, if required. The Driver Properties grid view will automatically update as changes are made.
Test the connection to confirm that the connection to the ODBC data source has been successfully created before saving and closing the ODBC Relay Connection Configurator.
Editing ODBC Connection Properties
After establishing the basic connection to the relevant ODBC driver or data source, either for a standard connection or using the Remote Data Relay, you can add more advanced configuration, if required. Highlight the relevant connection and click Properties.
General Tab Properties
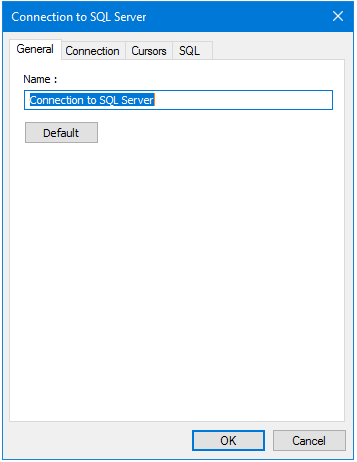
- Name — The connection name.
- Default — Applies the default connection settings for the specific ODBC driver to the connection. This overwrites existing settings.
Connection Tab Properties
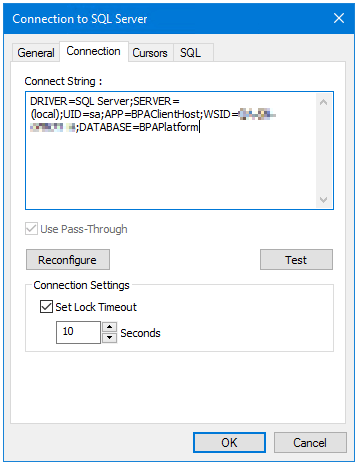
- Connection String — Contains the full connection string.
- Use Pass-Through — This property is only available with some drivers. You can choose to make the connection directly to the driver (enabled), or use the Microsoft Data Access Objects (DAO) API to make the connection to the driver.
- Reconfigure — If any changes are required, use Reconfigure to open the configuration window.
- Test — Tests the connection to the database.
- Connection Settings — If required, you can set a time-out period for connecting to the database in Seconds.
Cursors Tab Properties
Use the properties in the Cursors tab to change the type of database cursor used when executing queries.
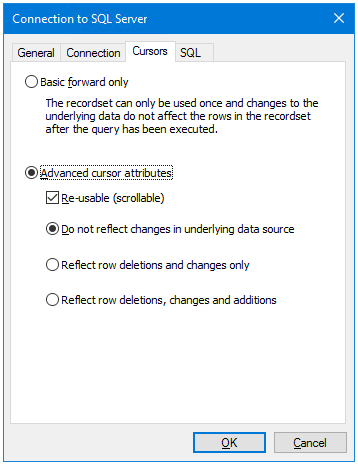
- Basic forward only — Use this option where you expect the task to only use the results from the Database Query (ODBC) step once. The result set from the queried rows can only be read top-to-bottom. The cursor cannot be reset so the query cannot be re-used. All ODBC drivers support this mode.
- Advanced cursor attributes
- Re-usable (scrollable) — This property allows the cursor to move backwards and forwards through the result set, thus the Database Query (ODBC) output can be consumed by multiple steps in the same task.
- Do not reflect changes in underlying data source — The rows returned by a query are cached independently at the time the query is executed. When the result set is actually read, any changes made to the source data since the query was executed are not reflected in the result set.
- Reflect row deletions and changes only — Any changes made to the source data since the query was first executed (updates and deletes to rows in the result set only) are reflected.
- Reflect row deletion, changes and additions — Any changes made to the source data since the query was first executed (updates, inserts, and deletes) are reflected in the result set.
SQL Tab Properties
The properties available in the SQL tab set the supported rules for the selected ODBC driver or data source for the SQL statements.
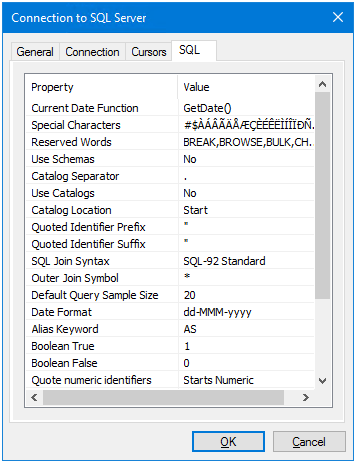
For more information, refer to your ODBC driver documentation.
Step Configuration
Even though the Database Query (ODBC) tool is found under two different tool categories, they do not affect the functionality of the tool.
To add a new Database Query (ODBC) step to an existing task, you either:
- Click and drag the Database Query (ODBC) icon from the Task Browser to the task Design area.
- From the task’s Design tab, right-click on empty space and select Add > then either Data Connectors > Database Query (ODBC) or Input > Database Query (ODBC).
– OR –
For a detailed description of how to create new tasks, refer to the product help.
About the General Tab
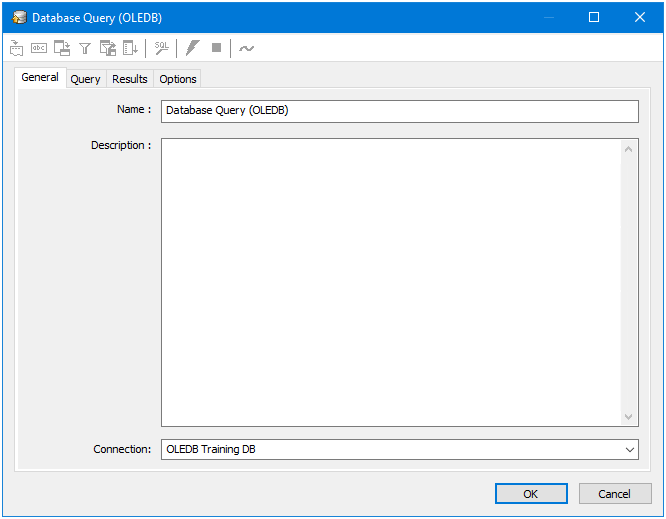
The General tab is used to Name and describe (Description) this task step.
Connection — You must choose the for this task step to use.
About the Query Tab
You use the Query tab to build the SQL statement to query the database. You can either use the Design interface to build the statement or create it manually in the SQL tab.
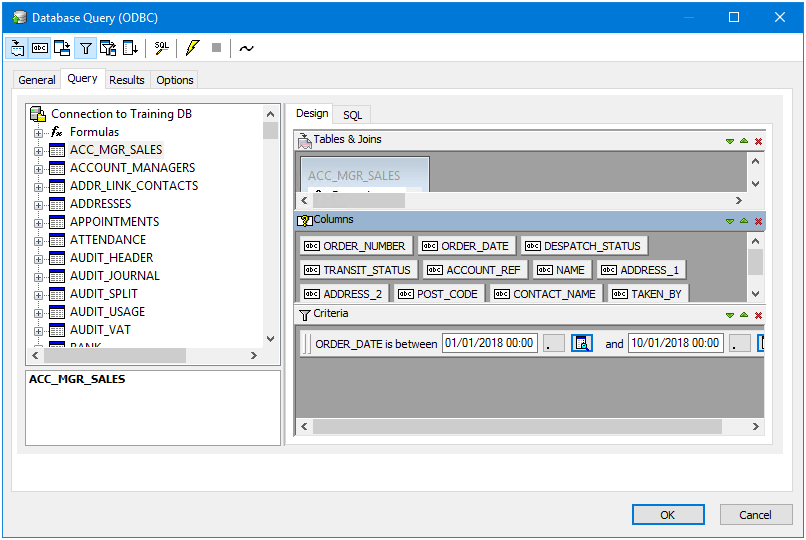
Using the Design Interface
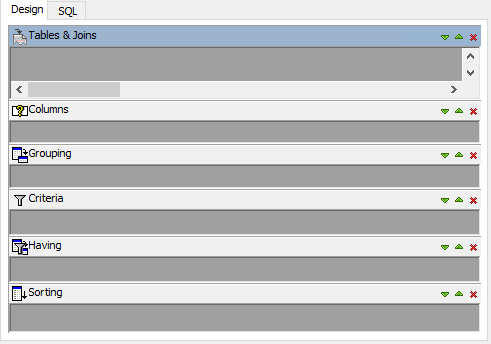
The Design tab allows you to build the SQL statement by dragging-and-dropping database formulas, tables, and table columns from the schema tree on the left:
Tables & Joins
The Tables & Joins pane displays the tables within the query and the relationships (joins) between them.
If not shown, click ![]() in the toolbar to display this section.
in the toolbar to display this section.
Columns
The Columns pane is used to specify the columns that are returned in the query. Available database columns are displayed in a tree structure to the left of the interface. Formulas can also be created “on-the-fly” to provide manipulation of data whether for formatting or calculations.
If not shown, click ![]() in the toolbar to display this section.
in the toolbar to display this section.
Grouping
The Grouping pane is used to create a query that returns consolidated data and is commonly used in conjunction with aggregation functions such as SUM or COUNT. By selecting certain columns in the Grouping pane the data is consolidated so that no duplicates exist across the fields returned. In turn, the aggregate functions allow information such as totals or averages to be calculated across the records that are consolidated. The pane corresponds directly with the GROUP BY clause in the SQL syntax.
If not shown, click ![]() in the toolbar to display this section.
in the toolbar to display this section.
Criteria
The Criteria pane is used to restrict the rows that are returned by the query — the WHERE clause of the SQL statement. The defined criteria are applied before Grouping, if used — see above. Multiple criteria can be added and nested to ensure precedence when using a combination of AND and OR operators.
If not shown, click ![]() in the toolbar to display this section.
in the toolbar to display this section.
Having
The Having pane has exactly the same features as the Criteria pane. Columns are added in the same way and criteria selected for filtering is identical. The difference between them is the order in which they are processed when the query is run. The Having filter is always applied after the Grouping filter. For example, a company has offices in different locations:
- Columns are added in the Columns area to provide order and invoice information for all offices.
- A Criteria filter is applied to only include orders received for the current month.
- A Grouping filter is then applied to group all rows by office location.
- Finally the Having filter is applied to only include orders for which an invoice has been raised.
If not shown, click ![]() in the toolbar to display this section.
in the toolbar to display this section.
Sorting
Columns are added to the Sorting pane to set the order in which the query results are displayed — the SORT BY clause. The arrow to the left of the added column indicates the direction of the sort (ascending (default) or descending). Double-click the arrow to change the direction.
Columns are sorted in the order they are added but you can change this by dragging-and-dropping columns to new positions.
If not shown, click ![]() in the toolbar to display this section.
in the toolbar to display this section.
Adding Formulas
Formulas are used to create pseudo-columns only available for use by the task.
For example, to display the monetary value of an item in a different currency, you would create a formula to multiple value by a fixed number. You’d then drag the new formula to Columns to be included in the query.
To create a formula, either:
- Right-click on Formula in the left-hand tree and select New Formula
- Right-click on a table join in the Tables & Joins section and select Convert to Formula (recommended when creating formulas based on the result set of the table join)
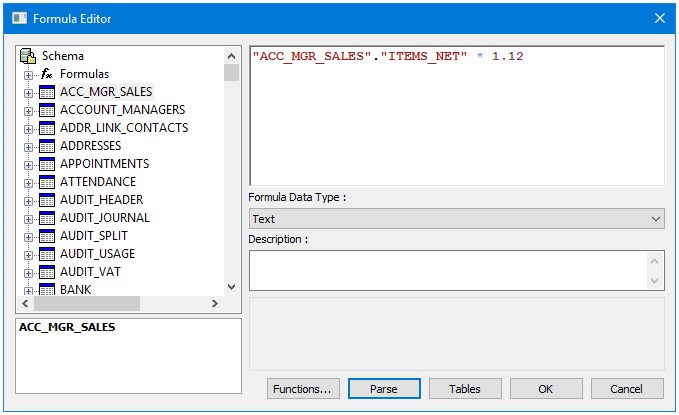
Drag-and-drop tables or columns from the Schema tree to the editing area — when converting a join to a formula, the columns are automatically added to the editing area joined with a =, new formulas have a blank editing area.
Choose the Formula Data Type from the drop-down; you must set this if adding columns to the formula which have different data types.
If required, add a short Description for the formula.
The available Functions are dependant on the underlying database engine and the driver in use.
Click Tables to ensure the correct tables are linked to the formula.
Click Parse to ensure your new formula is correct.
Adding Predicates
SQL predicates are logical conditions applied to clauses, functions, and expressions in the statement. Click ![]() in the toolbar to add predicates:
in the toolbar to add predicates:
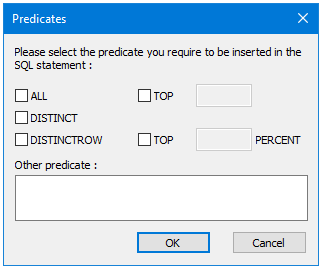
Standard SQL predicates are supported and provision is made to support proprietary predicates available with certain drivers:
- ALL — Return all query results as opposed to other predicates that restrict the query results. This predicate is included largely for completeness as the majority of drivers assume the ALL predicate if no other predicate is used.
- DISTINCT — Removes duplicate rows, taking into account only those columns that are requested in the query.
- DISTINCTROW — Removes duplicate rows, taking into account all columns in the source for the tables requested in the query, irrespective of the columns that are actually requested in the query.
- TOP — Return the number of rows specified, starting from the top of the result set. The sorting of the query affects which rows are returned.
- TOP (PERCENT) — Return the percentage of rows specified, starting from the top of the result set. The sorting of the query affects which rows are returned.
- Other predicate — Allows another predicate statement to be manually entered. Such statements are
inserted after any standard predicates selected.
Using SQL Free Type Mode
The SQL tab displays the script version of the SQL statement being build in the Design tab:
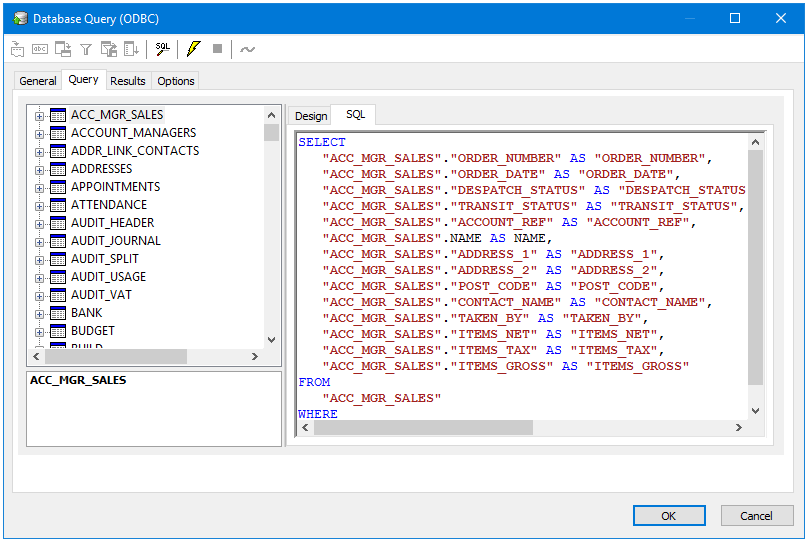
If required, you can edit the existing script or create it from scratch using the “SQL free type mode” feature – click ![]() in the toolbar.
in the toolbar.
Testing the SQL Statement
From the toolbar, click ![]() to test the script. Results are shown in the Results tab. If required, click
to test the script. Results are shown in the Results tab. If required, click ![]() to cancel the current test being run.
to cancel the current test being run.
About the Results Tab
The Results tab displays the results of the SQL statement built in the Query tab — click ![]() first.
first.
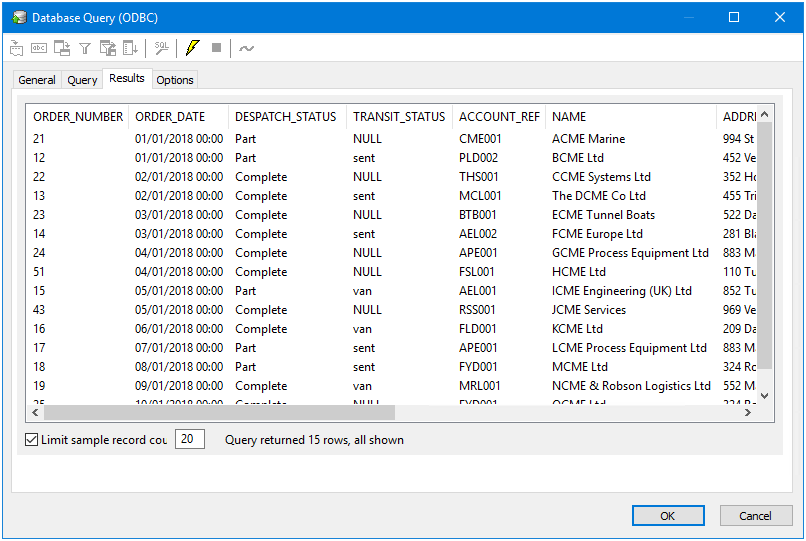
If required, to speed up the test you can Limit [the] sample record count to return a reduced number of rows.
About the Options Tab
The Options tab allows you to define how errors in this step are handled at task runtime.
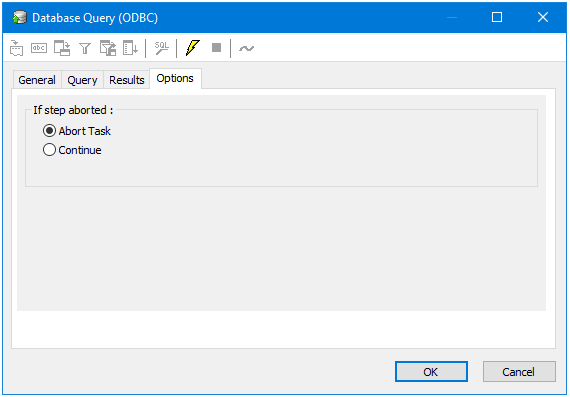
If the step is aborted, you can choose to Continue processing onto the next step in the task, or terminate the whole task immediately (Abort Task).