What is the Import Flat File tool?
The Import Flat File tool imports a delimited or fixed-width file from a nominated file storage provider or file server location into BPA Platform, extracts the file contents including any file properties, and outputs it as either a recordset or as XML.
The columns that make up the recordset, and the nodes and nested elements for the XML file can either be inferred from an imported example or created manually.
Data validation can also be applied to only import required data.
What is a Flat File?
A flat file (also referred to as a “flat file database”) stores unstructured data in plain text format. It does not contain:
- Any internal hierarchy
- Any links to other files
- Any word processing information or formatting
For BPA Platform, a flat file contains a single “table” of data, with one record per line. You specify the data type of each column and use delimiters to separate each column in a record.
Import Flat File Tool Features
The Import Flat File tool provides the following features
- Ability to import flat file content from Google Drive, OneDrive and SharePoint Online
- Ability to import flat file content from the local file system
- Ability to save partially configured connections
- Manually create a schema for the XML output consisting of nodes and nested elements
- Configure properties of each node and element to select the data to be extracted for each
- Preview the XML schema structure before saving and running the task
- Specify the source file properties to be extracted at task run-time and exposed to other steps
- Browse and select a file containing column headings in the first row to structure the output data
- Output XML for use by other task steps
- Output XML as a string for use by other task steps
- Output a recordset for use by other task steps

White Paper - Import Flat File
Import Flat File Tool: Working with other Tools
The Import Flat File tool can directly interact with the following tools:
Consuming from Other Tools
The Import Flat File tool can directly consume objects outputted by the following tools:
| Icon | Tool Name | Tool Category |
|---|---|---|
| Import Flat File | Input | |
| Import XML Document | Input |
Objects Consumed
The following objects, outputted by the above tools, can be directly consumed by the Import Flat File tool:
- Recordset — Tabular data from any BPA Platform tool capable of exposing such data (see above)
Exposing to Other Tools
The Import Flat File tool exposes objects which can be directly consumed by the following tools:
| Icon | Tool Name | Tool Category |
|---|---|---|
| Import XML Document | Input | |
| Convert Recordset to XML | Format | |
| Create Workflow Job | Format | |
| Format as Flat File | Format | |
| Format as HTML | Format | |
| Format as HTML Pro | Format | |
| Format as Text | Format | |
| Run Crystal Report | Format | |
| Run Microsoft Reporting Services | Format | |
| Run Microsoft Word (Merge) | Format | |
| Save File | Output | |
| Transfer File (FTP) | Output | |
| Call COM Object | Execute | |
| Run External Program | Execute | |
| File Management | General | |
| Filter Data | General |
Objects Exposed
The Import Flat File exposes the following objects which can be directly consumed by the above tools:
- Step Properties — Standard step properties are available allowing you to use statistical data of the tool
- InputData — This object is only available if a file is consumed from a previous task step. It contains the imported file contents.
- FileProperties — This object exposes the source file’s
Name, Size, Type, DateModified, DateCreated, DateAccessed,andAttributesproperties collected at task run-time. You can set which properties are exposed in the File Properties dialog box. - ImportedFileDetails — This object exposes the imported file’s Path and Filename.
- Recordset — Tabular data from any BPA Platform tool capable of exposing such data (see above) (This property is only available if a Recordset output is selected.
- OutputXML — This object exposes two sub-objects (this property is only available if XML output is selected (see Specifying the Output Type)):
- Output Schema — This contains the XSD file for the output
- Output XML — This contains the XML produced by the Import XML Document tool
- RowCount — Returns the number of rows processed for the output. This applies to both recordset and XML outputs, and considers whether a header row was included in the consumed file (input) or whether empty rows are ignored — see Specifying How to Read the Imported File.
- SuccessRowCount — Returns the number of rows successfully processed for the output. This applies to both recordset and XML outputs. SuccessRowCount + FailRowCount should always equal RowCount.
- FailRowCount — Returns the number of rows that the Import Flat File tool was unable to process. This applies to both recordset and XML outputs.
Unsupported File Types
Note that Import Flat File cannot support EDI file types where the data is presented vertically, that is, a new row for each column-type rather than a new row for each record.
Global Configuration
The global configuration for the Import Flat File tool is used to create connections to selected external file and cloud-based storage providers, such as SharePoint Online, OneDrive, or Google Drive.
You access the Import Flat File – Global Configuration interface from the resources tree — expand System > Tools > Input and double-click Import Flat File in the items list.
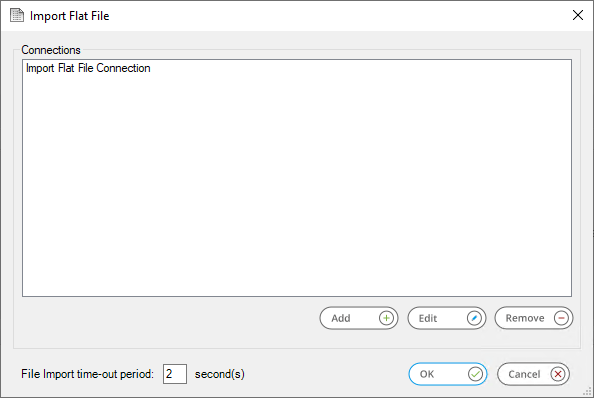
Click Add to create a new connection to external file storage, or one of the supported file system providers.
Use Edit and Remove to manage your existing connections.
The File Import time-out period determines how long the Import Flat File tool will attempt to import a file. If the file cannot be imported, after the defined import time-out period, an error is written to the Event Log. The default period is 2 seconds.
Creating Import Flat File Connections
Provide details and establish connection to an external file system.
About the General Node
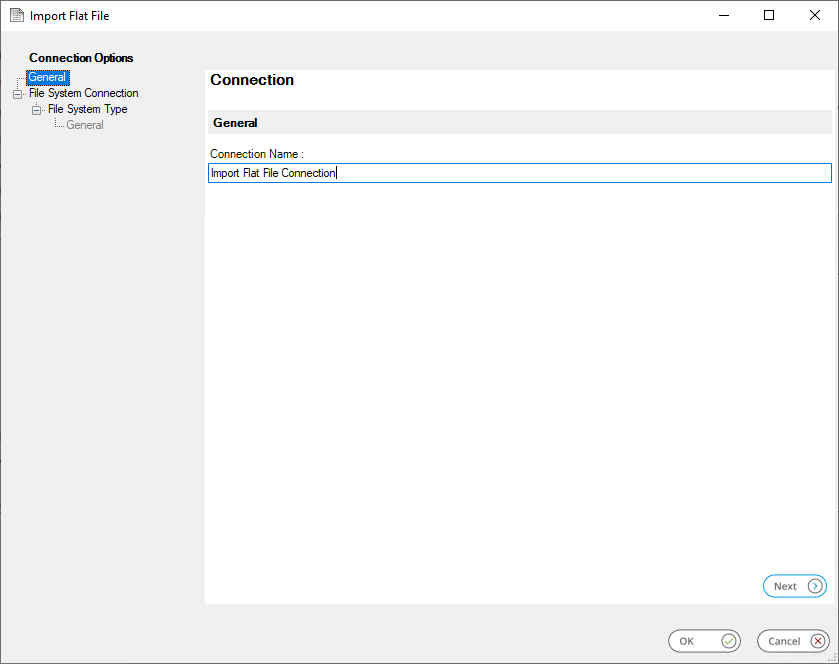
Enter a unique Connection Name for the Import Flat File connection. If adding connections for different types of file system provider, it is recommended you add such details to the connection name to enable you to identify each connection.
About the File System Connection Node
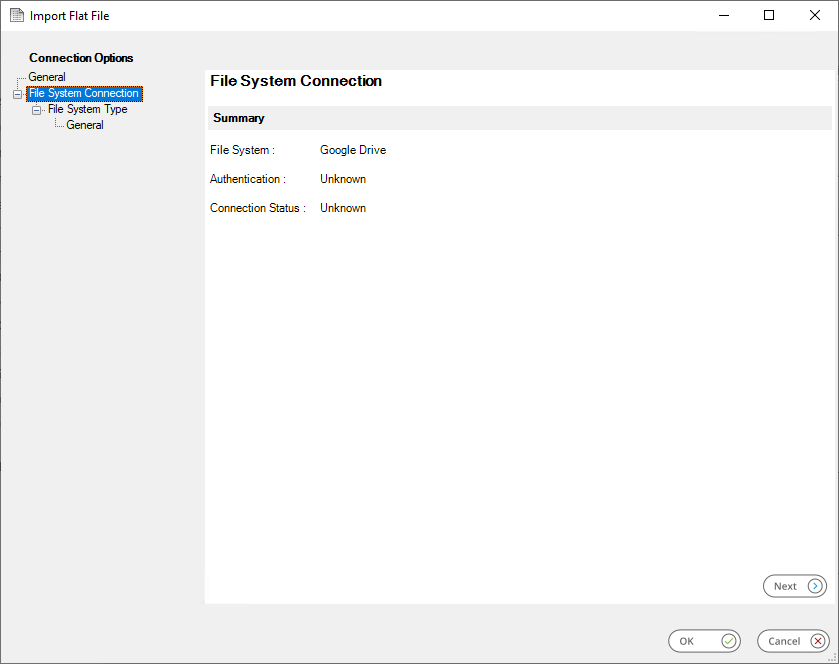
The File System Connection node, selectable in the Connection Options tree, provides a summary of the connection settings which have been defined in the subsequent File System Type and General node pages. Where no configuration has taken place, the default values for each field will appear as Unknown.
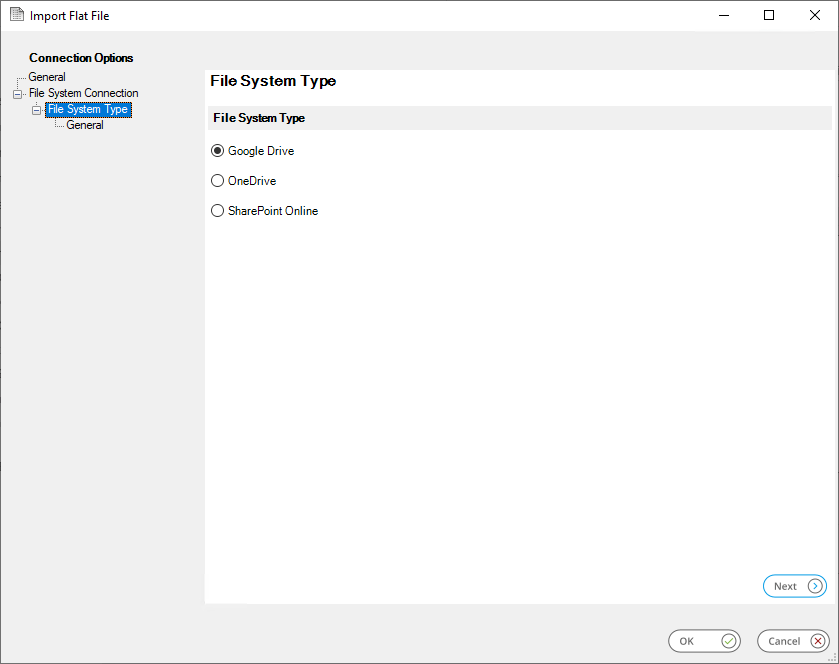
About the File System Type Node
The required File System Type can be selected from the list of supported external file storage providers.
About the File System Type > General node
Following the selection of an external file storage provider type the General node will be enabled.
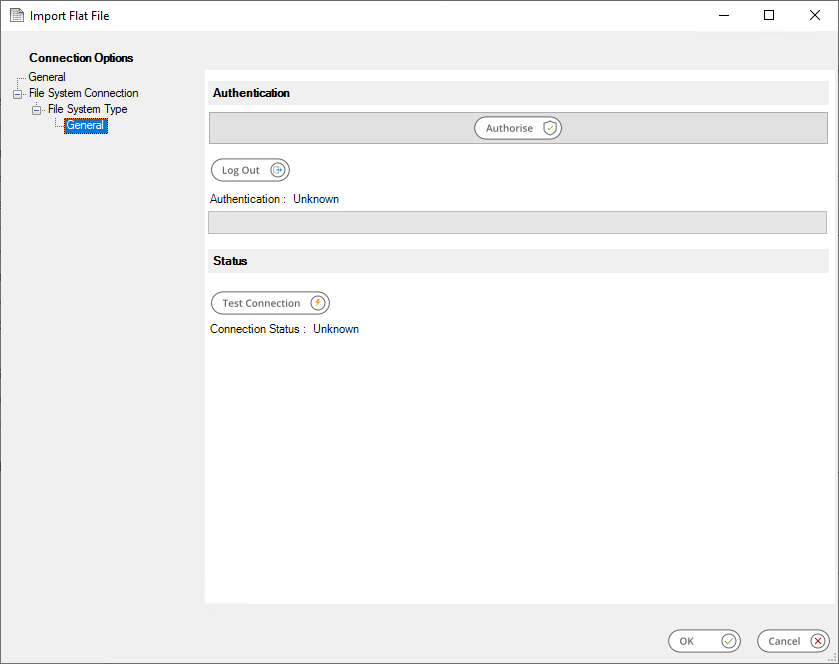
Click Authorise to open the selected storage provider’s login panel. This dialog is managed by the storage provider and displays the fields required to complete modern or multi-factor authentication to your account with them.
The Log Out button can optionally be used to disconnect an established connection. The authorisation process must be repeated if reconnection is subsequently required.
Step Configuration
When creating new tasks, Import Flat File is located under Input in the Task Browser.
To add a new Import Flat File step to an existing task,:
- Click and drag the Import Flat File icon from the Task Browser to the task Design area.
- From the task’s Design tab, right-click on empty space and select New > Input > Import Flat File.
– OR –
For a detailed description of how to create new tasks, refer to the product help.
About the General Tab
The General tab is used to Name and describe (Description) the Import Flat File task step.
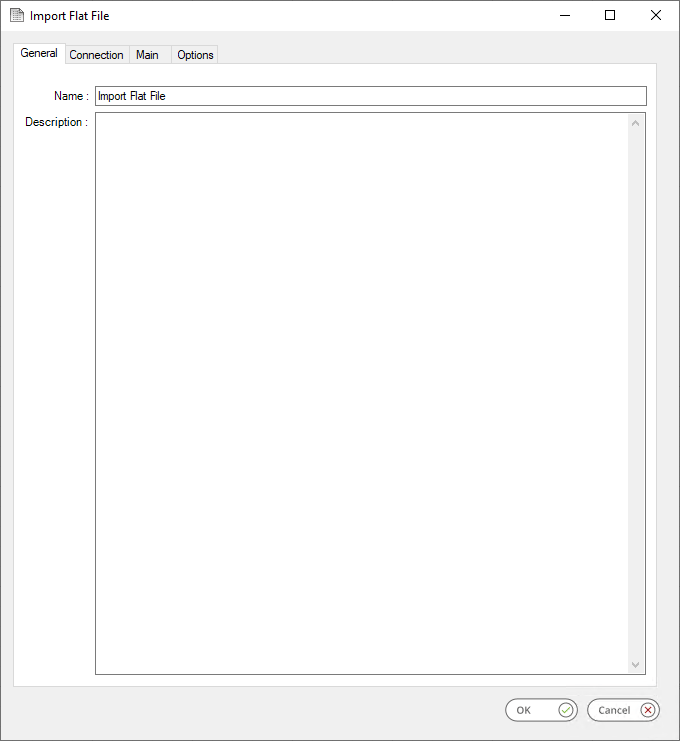
Enter a unique task step Name
The Description field, although optional, can be used to store information relating to the Import Flat File task step.
About the Connection Tab
The Connection tab is used to establish a connection to the Import Flat File source location.
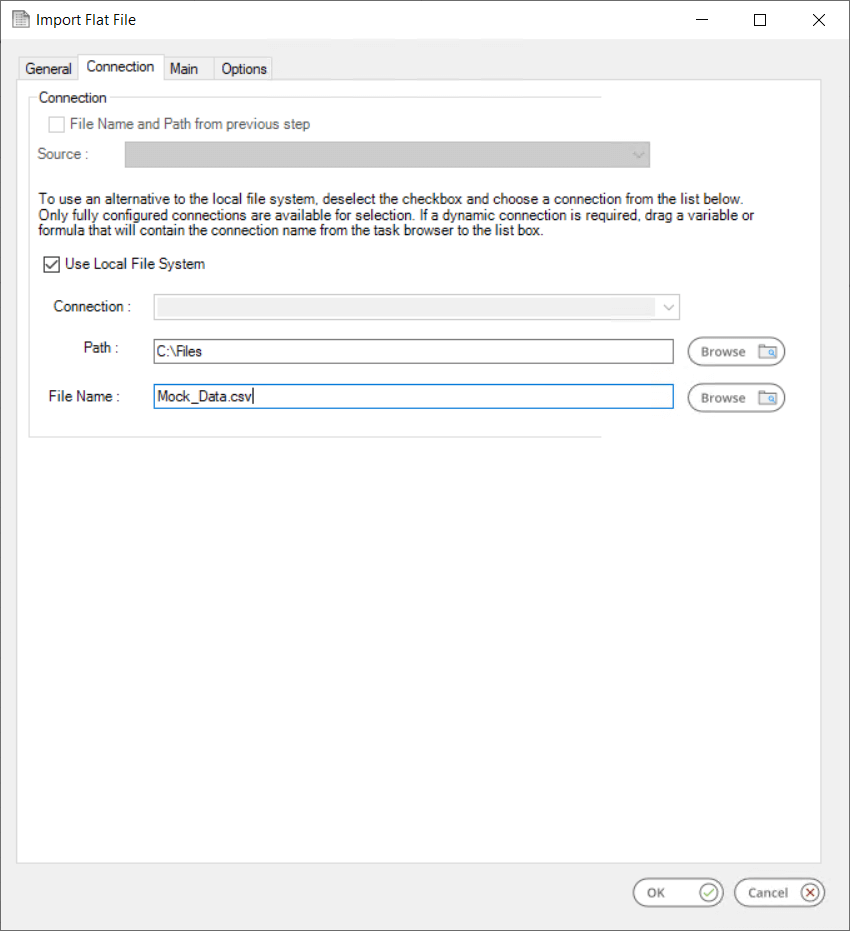
By default, the Import Flat File tool will import files located on the local file system. If connections to other file sources are available, then the step can be configured to import files from those locations. To do this, either clear the Use Local File System checkbox to enable the Connection drop-down and select from the connection settings previously set-up in the Global Configuration; or, if the original file name and path are available from the preceding steps, use a File name and path from previous step in the task.
- File name and path from a previous step — If enabled, use this option to import a document previously created or imported by another task step (see Consuming from Other Tools).
- Source — Contains all available task steps that have available document outputs
- Use Local File System — Selected by default, this imports a file from the local system folder and file structure.
- Connection — Deselect the checkbox for Use Local File System to enable the selection of external file storage connections set-up in the Global Configuration.NOTE: Only fully configured connections will appear in the Connection drop-down list. Connections flagged as ‘Configuration Incomplete’ will not be shown here until such time that configuration is completed.
Use a BPA Platform variable or formula to create a dynamic connection, where the connection used is determined by runtime circumstances. At runtime, the contents of the variable must match the name of one of the global connections — this is case-sensitive. See product help for further details.
- Path — To specify the Path, manually enter the path details or click the Browse button to locate and select the required source folder. The presented folder structure is dependent on the file server or file system provider that was selected in the Connection tab.
- File Name — The document to be importedTIP: Use of wildcards are supported here so that multiple documents can be imported by the same step at run-time.
About the Main Tab
Use the Main tab to indicate how to read the imported file and to select the output type and structure required.
Specifying the Output Type
You can choose between:
- XML – Root Node Name — You must provide the name of the root (top) node in your XML.
- Recordset
Specifying How to Read the Imported File
In the Input pane, specify how the imported file is read and the data extracted:
- Header Row in File — If the imported file contains a header row, enable this parameter. Without this, the first row in your file is treated as contents.
- Example file to use for configuring outputs — If you have an example file of the expected output from this task step, enter the file path and name here. The Import Flat File tool uses certain features of this file to auto-populate parameters and also to provide a preview of the expected output when building the structure.NOTE: The example file must be located in the same storage provider selected in the Connection tab.
- Input File Encoding — If known, select the encoding. You can also manually enter the encoding as an ANSI code page identifier. If an Example file to use for configuring outputs has been selected, the encoding is detected and displayed here.
Default Separators
- You must specify the Default Separators for the imported file:
- Delimited — Use this option if the fields in the imported file are separated by a character. Select the relevant Delimiter, or if Other specify the delimiter in the box provided.
- Fixed Width — Use this option if the fields in the imported file have a set width. Note that if Header Row in File is enabled then Fixed Width is not available as header rows do not tend to appear in fixed width files.
- End of Row Marker — If known, select the End of Row Marker. If an Example file to use for configuring outputs has been selected, the end of marker is automatically selected.
- Text qualifier — This is a symbol denoting the beginning and end of a text string. These are particularly important if a field in the imported file contains the delimiter symbol as a standard character, for . If the imported file contains text qualifiers, choose the relevant one from the drop-down.
- Retain line feeds for data within text qualifiers — In a similar vein, if fields in the imported file contain line feeds in the text string, such as addresses where each address line is a new line, enable Retain line feeds for data within text qualifiers. This keeps the line markers in place when processing the file.
- Ignore empty rows at the end of the input file — Some input files may contain a blank row as the last line. If required, select this option to not add blank rows to the XML or recordset output should any be found.
- Multiple Record Types in File — Only used if outputting an XML file. A record type is a tag at the beginning of the data row, used to indicate a new type of record in the same file.
The record types can have a parent-child relationship or can be at the same level.
At the time of writing, recordsets do not support parent-child relationships, however, such multi-type files can be outputted as XML. Enable this parameter if multiple record type support is required in the XML output.
Extracting File Properties
If required, you can specify which of the imported document’s file properties are made available in the Task Browser at run-time:
- Name
- Size
- Item type
- Date modified
- Date created
- Date accessed (Not applicable for SharePoint Online or OneDrive)
- Attributes
Click Extract File Properties.
Defining the Output Structure
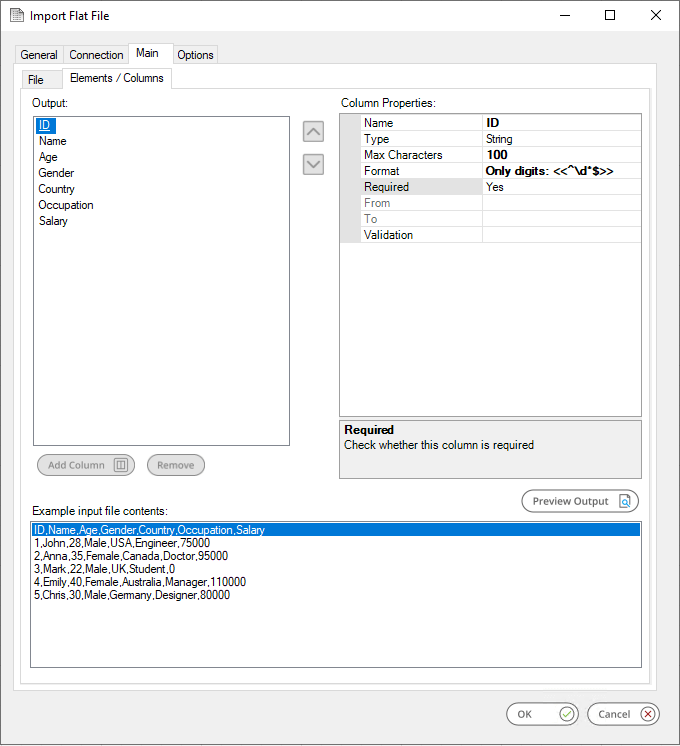
You define the output structure in the Elements / Columns tab.
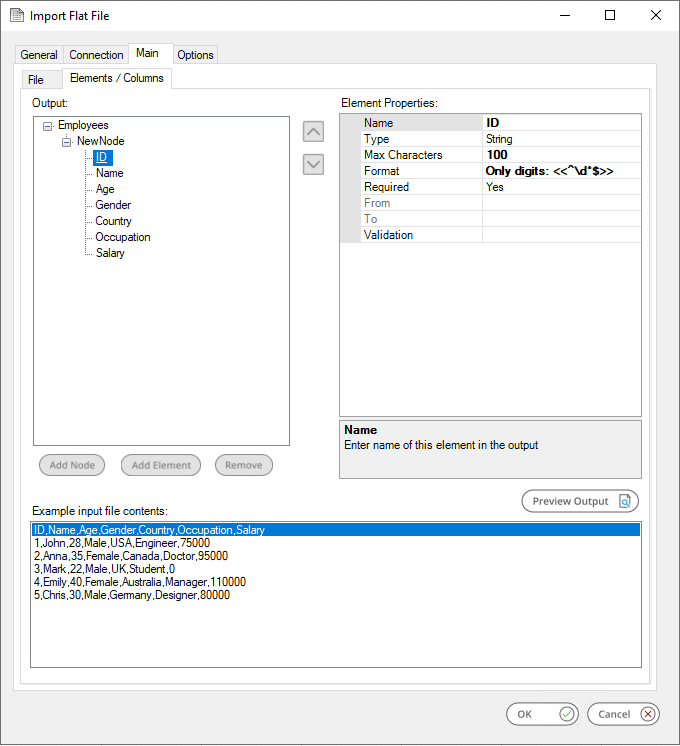
Output Type XML
Output Type Recordset
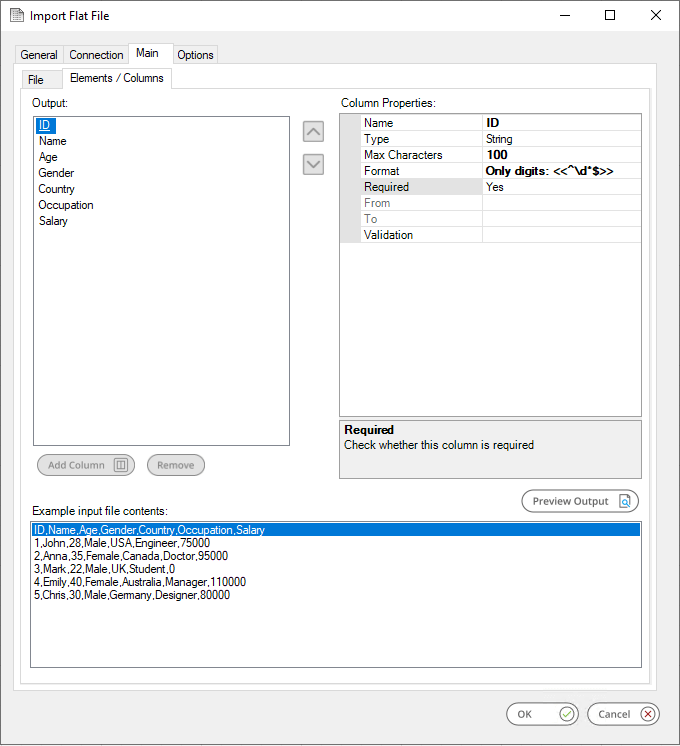
When Importing a Delimited File
Irrespective of the output type (XML or Recordset) if the source data contains a header row, then select Header
Row in File to ensure that this is handled correctly at runtime.
Selecting Header Row in File will also automatically create the output data structure with default property values in
the Elements / Columns tab, based on the input data structure. This can be customised, if required, to provide a
different column or element name, for example.
Alternatively, the output structure can be manually created using Add Element or Add Column depending on the
output type selected.
If wanting to output an XML file, the root node is pre-defined depending on the value entered for Root Node Name in the File tab.’
For all cases, you must adjust the value of each property as required to ensure correct and accurate data is outputted — see Setting the Elements / Columns Properties.
When Importing a Fixed Format File
If importing a fixed format file, you must define the output structure from scratch. If wanting to output an XML file, the root node is pre-defined depending on the value entered for Root Node Name in the File tab.
If your imported file contains a single record type (that is, Multiple Record Types in File is not selected), you can only Add Element[s] to the pre-defined node. If processing multiple record types, a parent-child structured XML file can be defined — use Add Node for the parent levels and Add Element for the children. Note that the XML “nodes” do not relate to any data value found in the imported file.
Note that the Multiple Record Types in File option is not supported for Recordset outputs.
Setting the Elements / Columns Properties
When defining the output structure, you must adjust the element / column properties to ensure the generated output at task runtime is as intended:
| Property Name | Description | Imported File Type | Output Type | Default Value |
|---|---|---|---|---|
| Name | The XML element or node, or Recordset column name. If the imported file is Delimited and has a header row and this is selected, the header is used as the Name. | Delimited / Fixed width | XML / Recordset | NewNode# / NewColumn# |
| Node Tag | If creating a multiple record type file, enter the tag string of the record types for this node. | Delimited / Fixed width | XML | N/A |
| Tag Column | If the input file is Delimited, the Tag Column is the column name where the tag occurs. | Delimited | XML | N/A |
| Tag Position | If the input file is Fixed Width, the Tag Position is the column name where the tag starts. | Fixed width | XML | N/A |
| Delimiter | If creating a multiple record type file and the values for this record type use a different delimiter than the one selected in the File tab, choose it from the drop-down. | Delimited | XML | N/A |
| End of Row | If this particular node has a different end of row character, choose the correct one here. | Delimited / Fixed width | XML | N/A |
| Type | The data type for the XML element or recordset column. | Delimited / Fixed width | XML / Recordset | String |
| Max Characters | The maximum length for the XML element or recordset column. Adjust this as required. | Delimited / Fixed width | XML / Recordset | 100 |
| Format | The data format of the XML element or recordset column — choose from: ► Email Address ► URL ► Phone Number ► Year ► Only letters ► Only digits If Type is either Date, DateTime, or Time and a Custom format is selected, you are prompted to enter a Mask to describe the format, for example: 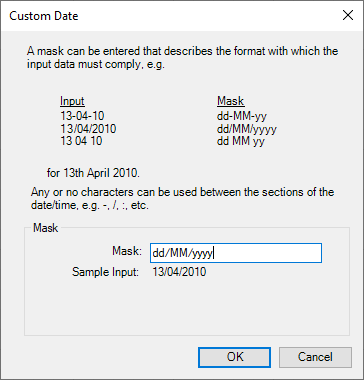 Custom formats must adhere to the .NET implementation of date / time format strings, see https://docs.microsoft.com/enus/dotnet/standard/base-types/custom-date-andtime-format-strings. For a detailed description of the supplied formats, refer to the product help. | Delimited / Fixed width | XML / Recordset | Unformatted |
| Required | This property indicates whether a value is always required for this XML element or recordset column at task runtime. Note the following: ► Selecting Yes may cause the step to fail if a value is not present ► Selecting No (default) will result in the step continuing when no value is present. | Delimited / Fixed width | XML / Recordset | No |
| From | The character number (starting the from the left) that the value for this XML element or recordset column starts. This property must be set. | Fixed width | XML / Recordset | N/A |
| To | The character number (starting the from the left) that the value for this XML element or recordset column starts. This property must be set. | Fixed width | XML / Recordset | N/A |
| Validations | The data validation applied to this XML element or recordset column — see Validating Data. | Delimited / Fixed width | XML / Recordset | N/A |
Validating Data
For the Import Flat File’s output, you can create one or more logical expression rules to filter the data contained in the input file(s) at task run time. This allows you to capture and correct any errors at the earliest possible time in a task.
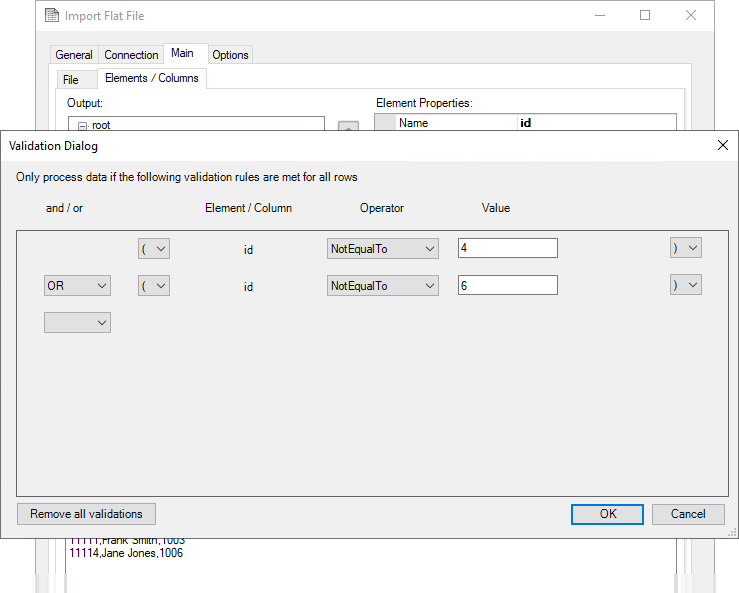
In the example above, all records in the input file are processed apart from those with 2 or 5 as their ID. Another important example would be to ignore rows that have blank fields.
If implementing multiple rules, ensure you build your rules in a logical sequence.
Supported Operators include:
- Equals
- Starts With
- Contains
- Ends With
- Greater Than
- Less Than
- Between
- Not Equal To
- Not Starting With
- Not Containing
- Not Ending With
- Is Not Between
- Is One Of
- Is Not One Of
- Is Null
- Is Not Null
Preview Output — Use this to check how the output is structured. During configuration the preview will either display a valid structure or any formatting errors based on the example input file contents.
► Example input file contents — If an example file has been defined in the File tab, this displays a small extract of that file as an aid to building your output.
About the Options Tab
The Options tab allows you to define how errors in this step are handled at task runtime.
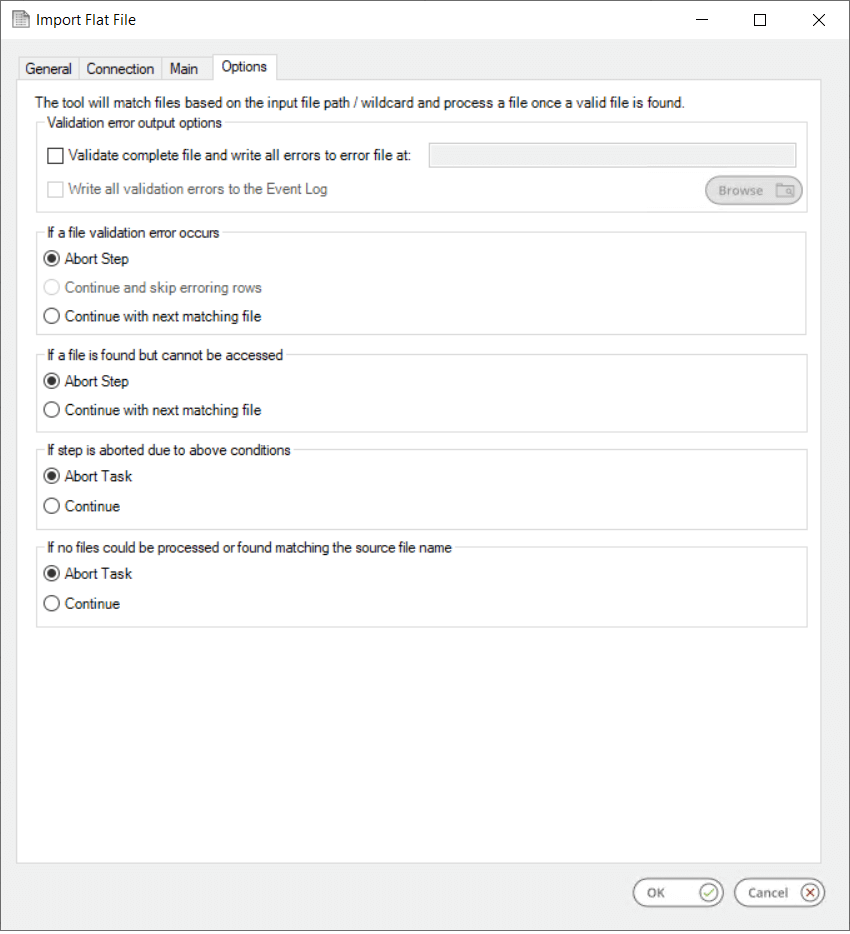
If using data filtering validation rules (see Validating Data), you can choose to write errors to a location and file of your choice (Validate complete file and write all errors to error file at) — note that the folder location must exist at task run-time; the Import Flat File tool cannot create folders. You can use variables to form part or all of the file path, for example,
► {=System.Variables("GlobalVariable")}\IFF\Errors
 ► C:\IFF\{=Variables("TaskVariable")}
 ► {=System.Variables("GlobalVariable")}\IFF\{=Variables("TaskVariable")}
You can either manually enter the variable values or drag them from the Task Browser to the relevant position in the file path. Additionally, you can choose to Write all validation errors to the Event Log — note this is an “additional” option rather than an “or” option.
If a file validation error occurs you can choose to:
- Abort Step — Once an error is encountered in a file, the task moves onto the next step in the task sequence
- Continue and skip erroring rows — The whole input file is still processed and any errors in records encountered are skipped
- Continue with next matching file — Once an error is encountered in a file, the Import Flat File step moves onto the next input file awaiting processing, if any
If a file is found but cannot be accessed for whatever reason, you can choose to:
- Abort Task — Whatever the reason for not being able to access the input file, BPA Platform aborts the whole task
- Continue with next matching file — Whatever the reason for not being able to access the input file, the Import Flat File step moves onto the next input file awaiting processing, if any
If Step is aborted due to above conditions you can choose to:
- Abort Task — If the Import Flat File tool cannot access or validate any input files, then the whole task is aborted
- Continue — If the Import Flat File tool cannot access or validate any input files, then next step in the task sequence is started
If no files could be processed or found matching the source file name you can choose to:
- Abort Task — If no more input files can be found or all input files have validation problems, and there are no more input files present, the whole task is aborted
- Continue — The next step in the task sequence is started