What is the Format as Flat File Tool
The Format as Flat File tool takes a BPA Platform recordset and converts it into a flat file to be used by another task step or external program.
The flat file output can be delimited or fixed width. You can also choose whether the flat file contains data for single or multiple record types.
At the time of writing, only BPA Platform recordsets can be formatted as flat files.
What is a Flat File?
A flat file (also referred to as a “flat file database”) stores unstructured data in plain text format. It does not contain:
- Any internal hierarchy
- Any links to other files
- Any word processing information or formatting
For BPA Platform, a flat file contains a single “table” of data, with one record per line. You specify the data type of each column and use delimiters to separate each column in a record.
White Paper - Format as Flat File
Format as Flat File Tool Features
The following features are available:
- Output a document used by other steps in the task
- Single or multiple document output
- New document created when data changes or for each new row
- Support for delimited and fixed width files
- Support for common and custom delimiters
- Support for common and custom end of row markers
Format as Flat File Tool: Working with Other Tools
The Format as Flat File tool can interact directly with the following tools:
Consuming from Other Tools
The Format as Flat File tool can directly consume objects outputted by the following tools:
| Icon | Tool Name | Tool Category |
|---|---|---|
| Call Stored Procedure (OLEDB) | Input, Data Connectors, Output, and Execute | |
| Database Query (ODBC) | Input and Data Connectors | |
| Database Query (OLEDB) | Input and Data Connectors | |
| Import Flat File | Input | |
| Import XML Document | Input | |
| Convert Recordset to XML | Format | |
| Convert XML to Recordset | Format | |
| Transform Data | Format | |
| Call Task | Execute | |
| Filter Data | General |
Objects Consumed
The Format as Flat File tool outputs the following objects which can be directly consumed by the above tools:
- Recordset — Tabular data from any BPA Platform tool capable of exposing such data (see above)
Exposing to Other Tools
Objects exposed by the Format as Flat File tool can be directly consumed by the following tools:
| Icon | Tool Name | Tool Category |
|---|---|---|
| Print Document | Output | |
| Save File | Output | |
| Send Email (SMTP) | Output | |
| Send Fax (Tobit) | Output | |
| Send Text Message | Output | |
| Transfer File (FTP) | Output | |
| Call COM Object | Execute | |
| Run External Program | Execute | |
| Run VBScript | Execute | |
| Web Service Connector | Data Connectors |
Objects Exposed
The following objects are outputted by the Format as Flat File tool for the above tools to consume:
- Documents (Text) — Plain text documents
- RecordSource — If an Input Recordset has been selected (see General tab), this contains the columns included in the recordset
- Step Properties — Standard step properties are available allowing you to use statistical data of the tool
Global Configuration
Global configuration is not required for the Format as Flat File tool.
Step Configuration
To add a new Format as Flat File step to an existing task, you either:
- Click and drag the Format as Flat File icon from the Task Browser to the task Design area.
- From the task’s Design tab, right-click on empty space and select New > Format > Format as Flat File.
For a detailed description of how to create new tasks, refer to the product help.
About the General Tab
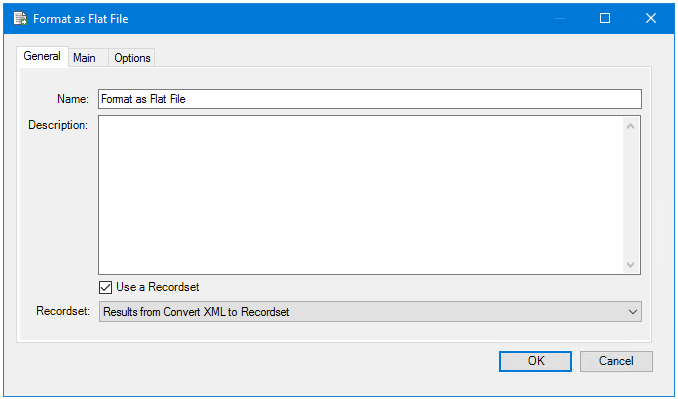
The General tab is used to enter the following details for the step:
- Name — Enter a meaningful name for the stepTIP: If this task instance makes use of two or more Format as Flat File steps, ensure the Name used is unique for each individual step.
- Description — If required, enter a description of this step At the time of writing, the Format as Flat File tool can only consume recordsets from other steps. The data from this recordset make up the contents of the flat file.
- Use a Recordset — Enable this parameter if recordset data from a previous task step is required to form the document
- Input Recordset — Contains all available recordsets from steps previously created in the task
About the Main Tab
You use the Main tab to specify what data is extracted from the recordsets, and how the flat file is structured.
The Main tab is split into two sub-tabs: you use the File tab to determine the format of the flat file, and the Output Columns tab to determine the structure.
Using the File Tab
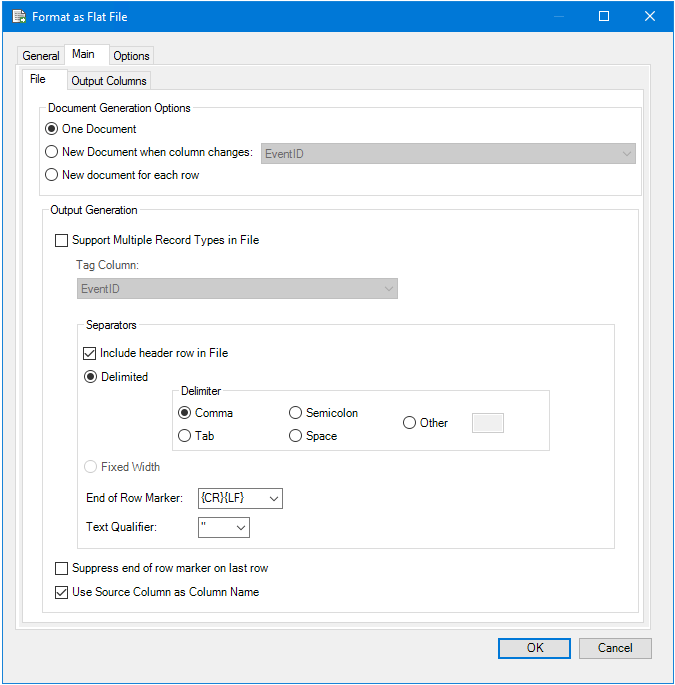
From the Document Generation Options pane, you specify when a new document is generated:
- One Document — Generate a new document each time the Format as Flat File task step is run.
- New Document when column changes — Generate a new document each time the value in a specified column changes. Select the relevant column.
- New document for each row — Generate a new document for every record in the input recordset.
In the Output Generation panel, you specify the file structure:
Supporting Multiple Record Types in File
This type of flat file supports a different row structure for different data values.
Enable Support Multiple Record Types in File.
“Tag” is the name given to the data the Format as Flat File step acts upon. Tag Column is the input recordset column that the step monitors for the data. Tag record type, or value, is the recordset column contents the Format as Flat File step is monitoring for.
All other options are not used for this type of flat file and are greyed out.
Using Separators or Fixed Width Formats
To use this format of flat file, you configure the exact specifications of each column.
Do not enable Support Multiple Record Types in File
From the Separators panel, you choose how each column in the flat file is distinguished from its neighbours:
- Include header row in File inserts the header details into the top of the file.
Choose whether the columns in the flat file are:- Delimited — Columns are separated with either a Comma, Tab, Semicolon, a Space, or a custom value of your choice (Other).
- Fixed width — Columns have a set number of characters (specified in the Output Columns tab). If the data in the column is less than the specified width, the column is padded with spaces up to the limit.
Choose the relevant End of Row Marker. You can also add custom markers by typing directly into the drop-down.
Text Qualifier indicates the start and end of a column. This is particularly important where the column data could also contain the chosen Delimiter as a legitimate character, for example, where lines of an address are separated by a comma, but the address is a single column in a CSV file. Again, custom qualifiers can be used here.
Output Generation
Use Suppress end of row marker on last row if using this file in a program that does not require the last row of the file to be blank, for example, an external program such as Notepad, or even a BPA Platform tool such as Print Document.
Use Use Source Column as Column Name to have the output column names the same name as the source column. This saves time with re-keying field values.
Using the Output Columns Tab
If you’ve chosen to Support Multiple Record Types in File, the Output Columns tab displays as:
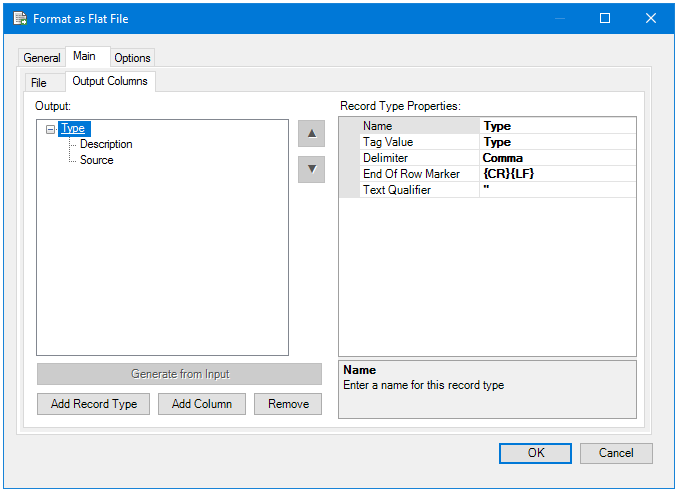
Use Add Record Type to specify the tag (record type) that starts a new row, where:
- Name — The name of the record type.
- Tag — The record type value
- Delimiter — The column separator, if required. Custom values are allowed.
- End of Row Marker — The marker for the end of row, if required. Custom values are allowed.
- Text Qualifier — The symbols for the start and end of a column, if required. Custom values are allowed.
Use Add Column to add the columns for the extracted data, where:
- Name — The name of the column. This value is used in the header row.
- Source Column — The column of the recordset.
- Use Text Qualifier — If required, you can choose to have a different text qualifier for this column to the rest of the row, even if no qualifier is used.
- From and To — If a Fixed Width Delimiter has been specified for this row, you must specify its start (From) and end (To) position in the row instead of the column length. For example, From position 25 To position 30, then the next column would start From position 31.
- Alignment — If a Fixed Width Delimiter has been specified for this row, choose whether the column data is aligned to the left (default) or to the right.
- Padding Character — By default, fixed width columns are padded with spaces if the data does not fill the whole width. You can choose a different symbol to pad out the column (Space, Hyphens, or Zeros). Custom values are allowed.
- Date/Time Format — If the Source Column contains date / time data, choose the output format for this column. You can either select a supplied format, or enter a custom date format — custom formats must adhere to the .NET implementation of date / time format strings, see https://docs.microsoft.com/en-us/dotnet/standard/base-types/custom-date-and-time-format-strings. Supplied formats include:
| Date/Time Format | Example |
|---|---|
d/M/yyyy hh:mm:ss | 20/9/2018 09:30:00 (12 hour clock, without AM/PM notations) |
M/d/yyyy hh:mm:ss | 9/20/2018 09:30:00 (12-hour clock, without AM/PM notations) |
d/M/yyyy h:mm:ss tt | 20/9/2018 9:30:00 AM |
M/d/yyyy h:mm:ss tt | 9/20/2018 9:30:00 PM |
d/M/yyyy HH:mm:ss | 20/9/2018 09:30:00 (24-hour clock) |
M/d/yyyy HH:mm:ss | 9/20/2018 21:30:00 (24-hour clock) |
d/M/yyyy | 20/9/2018 |
M/d/yyyy | 9/20/2018 |
hh:mm:ss | 09:30:00 (12-hour clock, without AM/PM notations) |
h:mm:ss tt | 9:30:00 AM |
dddd, MMMM dd, yyyy | Thursday, September 20, 2018 |
dddd, MMMM dd, yyyy h:mm:ss tt | Thursday, September 20, 2018 9:30:00 AM |
dddd, MMMM dd, yyyy hh:mm:ss | Thursday, September 20, 2018 09:30:00 (12-hour clock, without AM/PM notations) |
yyyy'-'MM'-'dd'T'HH':'mm':'ss | 2018-09-20T21:30:00 (24-hour clock) “T” is a delimiter between the date and time sections, and is a required character for this format. |
yyyy'-'MM'-'dd HH':'mm':'ss'Z' | 2018-09-20 21:30:00+0100 (24-hour clock) “Z” represents the time-zone offset from GMT. In the example above, it is 21:30 in the GMT+1 time-zone. |
If you did not select Support Multiple Record Types in File, the Output Columns tab displays as:
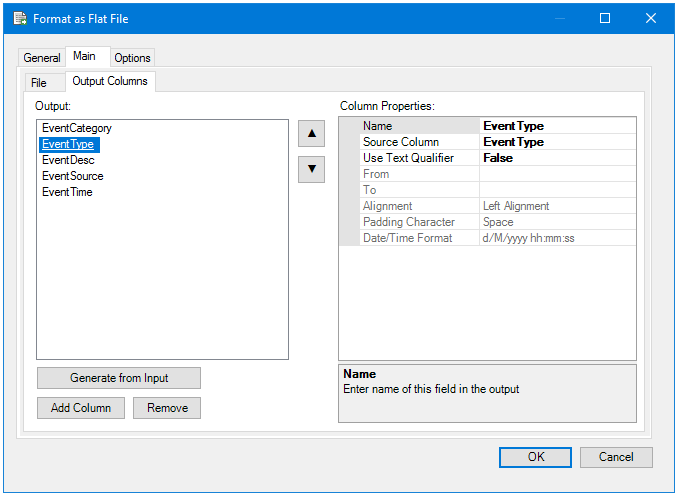
Use Generate from Input to create a flat file that uses the same column names, in the same order.
Use Add Column to add the columns for the extracted data.
From the Column Properties pane, specify the structure of each column in your output, where:
- Name — The name of the column. This value is used in the header row if enabled in the File tab.
- If Use Source Column as Column Name is enabled in the File tab, skip this field as it is automatically filled from the Source Column value.
- Source Column — The column of the recordset.
- Use Text Qualifier — If required, you can choose to have a different text qualifier for this column to the rest of the row, even if no qualifier is used.
- From and To — If Fixed Width has been specified for this flat file, you must specify its start (From) and end (To) position in the row instead of the column length. For example, From position 25 To position 30, then the next column would start From position 31.
- Alignment — If Fixed Width has been specified for this flat file, choose whether the column data is aligned to the left (default) or to the right.
- Padding Character — By default, fixed width columns are padded with spaces if the data does not fill thewhole width. You can choose a different symbol to pad out the column (Space, Hyphens, or Zeros). Custom values are allowed.
- Date/Time Format — If the Source Column contains date / time data, choose the output format for this column. You can either select a supplied format, or enter a custom date format — custom formats must adhere to the .NET implementation of date / time format strings, see https://docs.microsoft.com/en-us/dotnet/standard/base-types/custom-date-and-time-format-strings. Supplied formats include:
| Date/Time Format | Example |
|---|---|
d/M/yyyy hh:mm:ss | 20/9/2018 09:30:00 (12 hour clock, without AM/PM notations) |
M/d/yyyy hh:mm:ss | 9/20/2018 09:30:00 (12-hour clock, without AM/PM notations) |
d/M/yyyy h:mm:ss tt | 20/9/2018 9:30:00 AM |
M/d/yyyy h:mm:ss tt | 9/20/2018 9:30:00 PM |
d/M/yyyy HH:mm:ss | 20/9/2018 09:30:00 (24-hour clock) |
M/d/yyyy HH:mm:ss | 9/20/2018 21:30:00 (24-hour clock) |
d/M/yyyy | 20/9/2018 |
M/d/yyyy | 9/20/2018 |
hh:mm:ss | 09:30:00 (12-hour clock, without AM/PM notations) |
h:mm:ss tt | 9:30:00 AM |
dddd, MMMM dd, yyyy | Thursday, September 20, 2018 |
dddd, MMMM dd, yyyy h:mm:ss tt | Thursday, September 20, 2018 9:30:00 AM |
dddd, MMMM dd, yyyy hh:mm:ss | Thursday, September 20, 2018 09:30:00 (12-hour clock, without AM/PM notations) |
yyyy'-'MM'-'dd'T'HH':'mm':'ss | 2018-09-20T21:30:00 (24-hour clock) “T” is a delimiter between the date and time sections, and is a required character for this format. |
yyyy'-'MM'-'dd HH':'mm':'ss'Z' | 2018-09-20 21:30:00+0100 (24-hour clock) “Z” represents the time-zone offset from GMT. In the example above, it is 21:30 in the GMT+1 time-zone. |
About the Options Tab
The Options tab allows you to define how errors in this step are handled at task runtime.
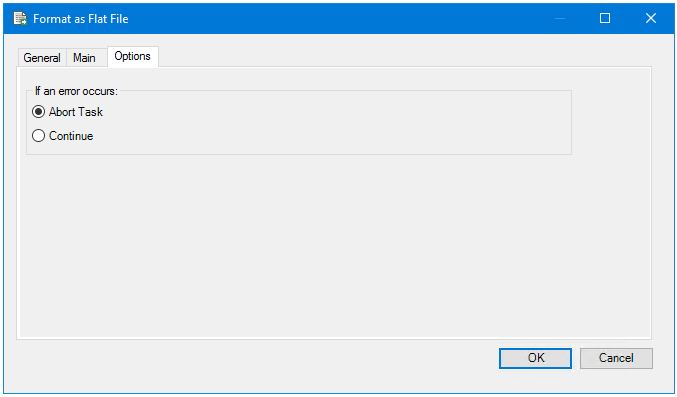
If an error occurs, you can decide whether the step should Continue processing, or terminate the step immediately (Abort Task).