Introduction to the Create Workflow Job Tool
What is the Create Workflow Job Tool?
The Create Workflow Job Tool is used to create a Task Step that dynamically creates Workflow Jobs. A Workflow Job Step dynamically generates one or any number of web page(s) containing fields for completion by recipients and publishes them to a web site folder on a specified web server. Each of these web pages is called a Workflow Job and can be assigned for completion to any number of recipients.
In addition, each Workflow Job can be assigned a number of Stages through which it must go before it is considered to be complete. For example if a Workflow Step is created to produce Purchase Orders for an item when the stock level reaches a certain point, the Workflow Job may need to go through a number of checking and review stages by stores, purchasing and QA personnel before being approved for purchase.
There are two methods by which recipients can access the Workflow Jobs that are applicable to them:
- The first method is for a hyperlink to the specific web page for the Workflow Job to be provided to the recipient in the body of an email. Clicking on the hyperlink opens the Workflow Job in a web browser window for the recipient to complete.
- The second method is for the recipient to use the myBPAPlatform application which allows the recipient to log in and manage all of his currently assigned Workflow Jobs.
Once a recipient has entered or selected the necessary data in the Workflow Job page and has completed it by pressing on the applicable Submit button, the data is stored against variables previously created in the BPA Platform Task and is used in subsequent Task Steps. So for our Purchase Order example this could mean that if a column status is changed to Approved then a Purchase Order could be automatically created and sent to a supplier.

White Paper - Create Workflow Job
Create Workflow Job Tool Features
- Utilise any OLEDB or ODBC data source
- Create single or multiple Workflow Jobs
- Assign any number of Stages to a Workflow Job
- Assign recipients for each Workflow Job
Working with other Tools
The other tools that the Create Workflow Job Step interacts directly with, whether by exposing information to it or consuming information from it, are listed below.
Consuming from Other Tools
| Icon | Tool Name | Tool Category |
|---|---|---|
| Database Query (ODBC) | Input and Data Connectors | |
| Database Query (OLEDB) | Input and Data Connectors | |
| Import Flat File | Input | |
| Convert XML to Recordset | Format | |
| Filter Data | General |
Objects Consumed
Objects that the Create Workflow Job Step consumes that are exposed by other Steps are listed below.
- Recordset — Information structured into columns and rows
Exposing to Other Tools
| Icon | Tool Name | Tool Category |
|---|---|---|
| Call Stored Procedure (OLEDB) | Input, Data Connectors, Output, and Execute | |
| Print Document | Output | |
| Save File | Output | |
| Send Email (SMTP) | Output | |
| Send Fax (Tobit) | Output | |
| Send Text Message | Output | |
| Transfer File (FTP) | Output | |
| Call COM Object | Execute | |
| Run External Program | Execute |
Objects Exposed
Objects that the Create Workflow Job Step exposes that can be utilised by other Steps are listed below.
- RecordSource — Displays the data provided by the previous Step in the Task.
- OutputURL — Displays the web address to which the Job is published.
- Memory Definitions — Displays a list of Memory Definitions created for the Step and the columns to be memorised for each one. Double-clicking on a Memory Definition then opens the applicable memory configuration dialog box to enable the details to be edited.
- Variables (Text) — Textual data is mapped to selected Variables for use in other Steps.
- Step Properties — A number of properties for the Step are exposed in the Environment tab of the Task Browser dialog box.
Global Configuration
The Create Workflow Job tool does not require any global configuration.
Step Configuration
To add a new Create Workflow Job step to an existing task, you either:
- Click and drag the Create Workflow Job icon from the Task Browser to the task Design area.
- From the task’s Design tab, right-click on empty space and select Add > Format > Create Workflow Job.
For a detailed description of how to create new tasks, refer to the product help.
About the General Tab
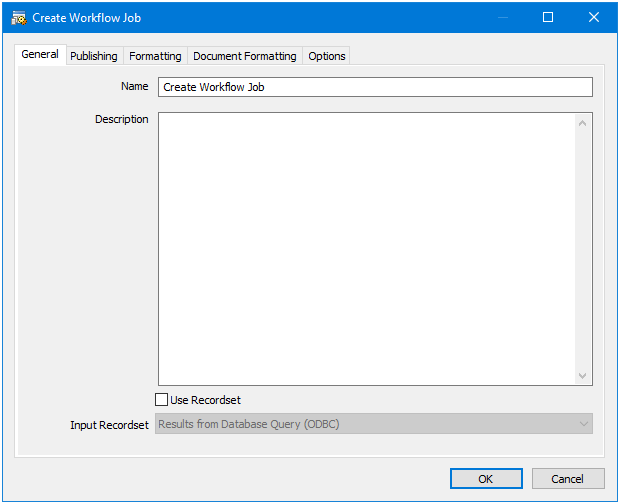
The General tab of the Create Workflow Job dialog box is used to enter the following details for the Workflow Job Step:
- Name — A unique name for the Step may be manually entered. The name is used to identify the Step within the Task and particularly within the Task Plan. It is advisable to name the Steps as accurately as possible so that the Task Plan itself gives the user a good impression of the overall Task process at a glance.
- Description — A description for the Step may be manually entered. The description is used to explain what the Step does and how it is configured to achieve this. When maintaining the Task, this helps users understand how the Task works.
- Use Recordset — When selected the Input Recordset drop down list is active
- Input Recordset — All available recordsets from Input Steps previously created in the Task are displayed in a drop-down list for selection
About the Publishing Tab
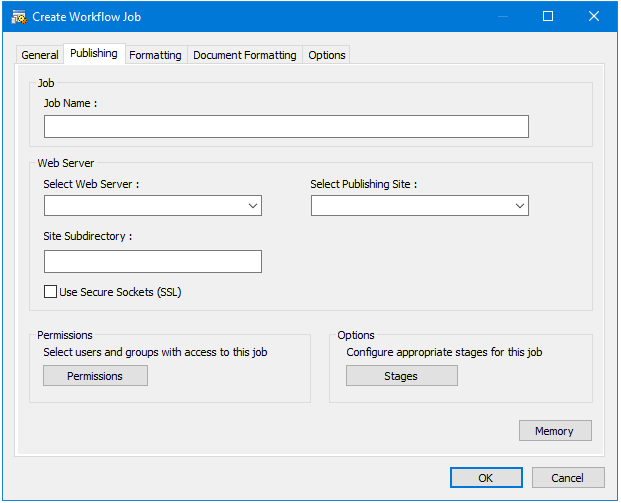
The Publishing tab of the Create Workflow Job dialog box is used to specify the location to which the Workflow Jobs (web pages) generated by the Workflow Step are to be published.
The dialog box contains the following:
- Job — This area contains the following:
- Job Name — A name may be manually entered or a dynamic name selected by dragging and dropping an object into the field from the Task Browser dialog.
- Web Server — This area contains the following:
- Select Web Server — Display a list of available web servers for selection.
- Select Publishing Site — Displays a list of web sites available on the selected web server for selection.
- Site Sub-directory — A name may be manually entered for the folder to be created under the root of the selected web site into which the web pages are to be published.
- Use SSL — If this option is selected then secure sockets communication is used when specifying the URL links for the web pages.
- Permissions — This area contains the following:
- Permissions — Displays the Permissions dialog box to specify the available users and groups who have access to the web pages from myBPAPlatform.
- Options — This area contains the following:
- Stages — Displays the Stages dialog box to enable the names of the stages and the order in which they are to be completed for the Workflow Job to be defined.
- Memory — Opens the Memory Definitions dialog box to enable a memory definition to be created for the Step.
About the Permissions Dialog
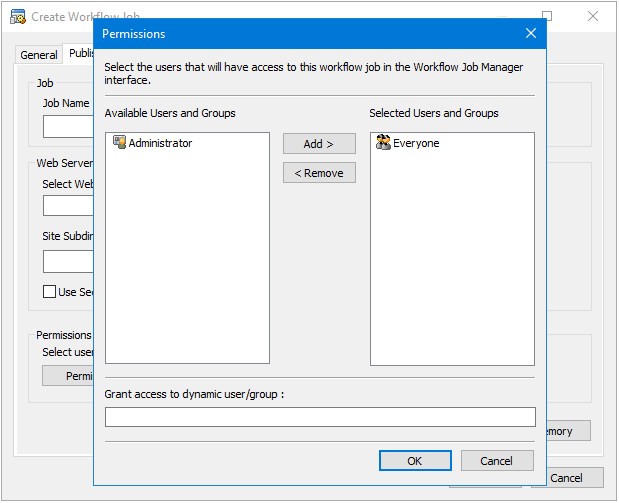
The Permissions dialog box is displayed when the Permissions button is selected in the Publishing tab of the Create Workflow Job dialog box and is used to select and de-select the users who may access the web pages. This is generally used in conjunction with myBPAPlatform which is an ASP.NET application that allows users to log in and manage their currently assigned workflow jobs.
The dialog box contains the following:
- Available Users and Groups Displays a list of available user and group names for selection by clicking on the name. Multiple names can be selected using standard Windows methods of:
- Clicking on a name and dragging the mouse up or down the list to highlight the required names.
- Clicking on a name, holding down the Shift key on the keyboard and clicking on another name to select the block of names between the two selected.
- Clicking on individual names whilst holding down the CTRL key on the keyboard.
- Selected Users and Groups — Displays a list of selected names. Names may be selected for removal using the same methods as listed above for the Available users and groups list.
- Add — Moves the names selected in the Available Users and Groups list into the Selected Users and Groups list.
- Remove — Moves the names selected in the Selected Users and Groups list into the Available Users and Groups list.
- Grant access to dynamic user / group — A dynamic user or group that is available through a parameter variable at Task run time may be dragged and dropped into the field from the Task Browser dialog box.
About the Stages Dialog
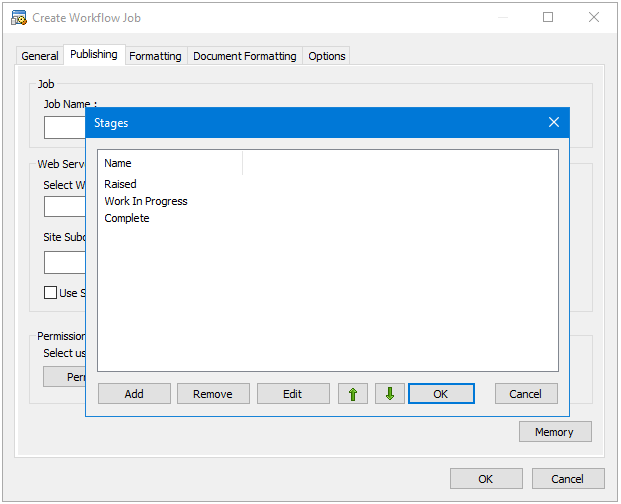
The Stages dialog box is displayed when the Stages button is selected in the Publishing tab of the Create Workflow Job dialog box and is used to add, edit or remove the stages applicable for the Workflow Job and to set the order in which they are processed.
Stages are used to indicate the status of a job to users and through the Stages dialog box you can create any number of Stages for a job. When viewing a job within myBPAPlatform the current Stage is always displayed. This may be changed to any other available Stage type created for the job.
The dialog box contains the following:
- Stages — Displays a list of available stages for the Workflow Job
- Add — Opens the Edit Stage dialog box to enable a new Stage name to be added
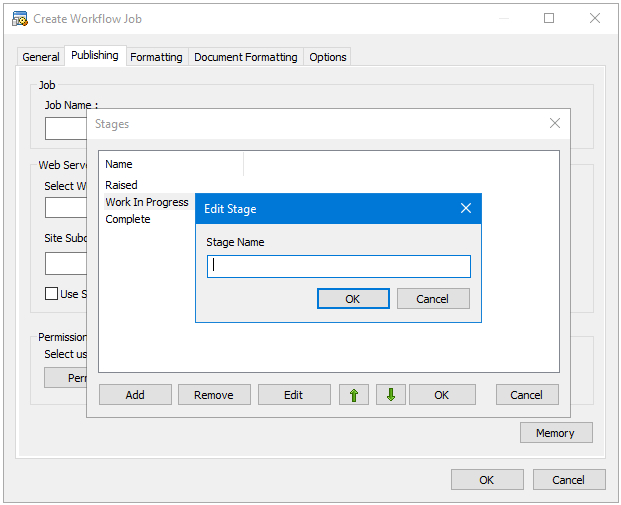
- Remove — Removes the selected Stage from the list
- Edit — Opens the Edit Stage dialog box to enable the Stage name selected in the list to be edited
- Up Arrow — Each click of the button moves the selected stage up one place in the list so that it is processed sooner
- Down Arrow — Each click of the button moves the selected stage down one place in the list so that it is processed later
About the Formatting Tab
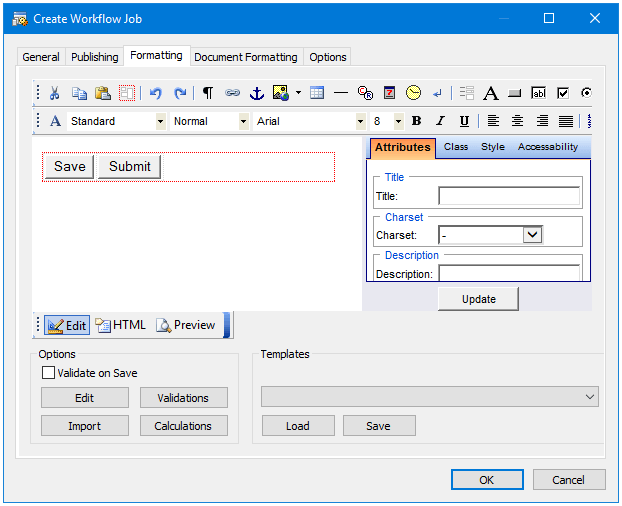
The Formatting tab of the Create Workflow Job dialog box incorporates an HTML Editor that is used to create the web page to be used for the Workflow Job.
The HTML editor provides a number of intuitive toolbars and controls for:
- Creating an HTML form
- Adding buttons, text boxes, radio buttons, check boxes and combo boxes to the form
- Adding custom fonts and colours
- Adding custom graphics and backgrounds
- Allowing dynamic fields to be dragged from the Task Browser dialog box onto any area of the design surface
- Allowing users to specify whether to use the default form submit confirmation message or to forward to a URL of their choice
- Allowing users to specify whether to use the default unknown job page or to forward to a URL of their choice
- Allowing users to use their default system HTML editor, including Visual Studio if installed
- Allowing users to select from a number of default templates and load them into the edit control. Templates are provided for:
- Yes/No
- Three way vote
- Simple Form. A basic form with 10 text fields, submit button and template labels
- Saving the currently loaded page as a new template
- Allowing users to import externally created HTML pages into the editor, including any embedded controls
- Validation of the HTML code
- Descriptions for some of the controls and features provided within the tab are listed below:
- Update — One feature of the HTML Editor application that needs to be pointed out is that after you have made any changes to the page contents you must click on the Update button to apply them.
- Scripting — This area contains the following:
- Edit — Opens the Workflow Job web form in your default HTML Editor application for editing.
- Validations — Clicking on the Validate button opens the Validations dialog box which lists any Validations created for controls contained within the Workflow Job.
- Validate on Save — If this option is selected then form validations are automatically triggered when a Workflow Job is saved / submitted in the myBPAPlatform web portal.
- Import — Displays a standard file browser dialog box to enable an externally created HTML page to be selected and loaded.
- Calculations — Clicking on the Calculate button opens the Calculations dialog box which lists any Calculations created for controls contained within the Workflow Job.
- Templates — To save time creating new Workflow Job, the current configuration may be saved as a Template and then recalled for use with another Workflow Job. This area contains the following:
- Templates — Displays all available Workflow Job Templates for selection.
- Load — Once a Template has been selected, clicking on this button loads it into the HTML editor within the Formatting tab.
- Save — Displays the Insert template name dialog box to enable the current configuration to be saved as a new Template.
Validating Workflow Jobs
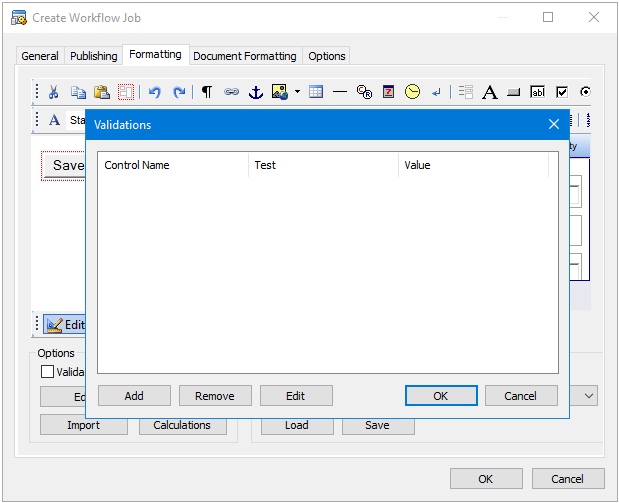
The Validations dialog box is displayed when the Validations button is selected in the Formatting tab of the Create Workflow Job dialog box. Validations may be created on controls contained within a Workflow Job web form to prevent invalid data being entered before the Workflow Job is submitted.
It displays a list of validations created for controls contained within a Workflow Job and enables them to be edited, deleted or new validations.
- Validations — Displays a list of validations created for the Workflow Job
- Add — Displays the Edit Validation dialog box which contains the following controls for creating a new validation:
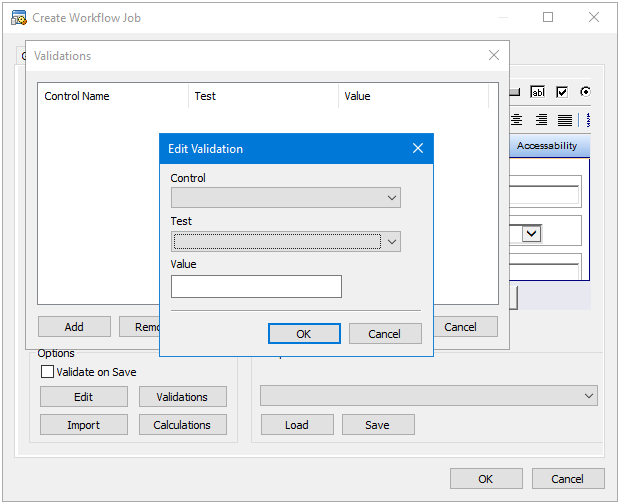
- Controls — Displays a list of controls available in the Workflow Job for selection.
- Test — Displays a list of criteria for selection . If either the Java Script or VBScript Expression criteria is selected, the Edit Script button is displayed.
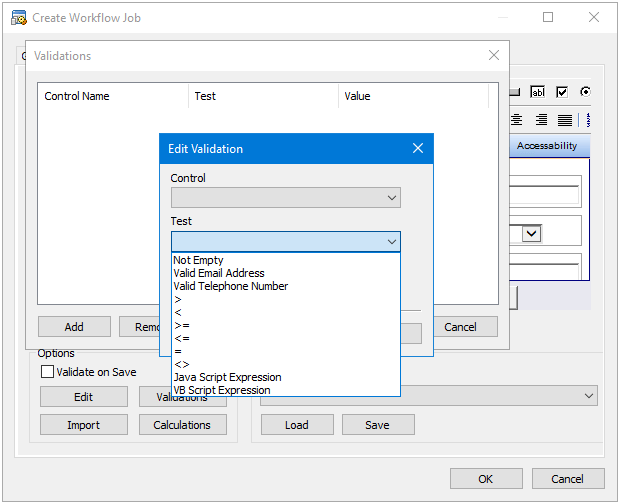
- Value — A value may be manually entered or a dynamic value entered by dragging and dropping an object into the field from the Task Browser dialog box.
- Edit Script — This button is displayed when either the Java Script or VBScript Expression criteria is selected in the Test drop down list. Clicking on the button displays the Rule Script dialog box in which the script may be manually entered.
- Remove — Removes the selected Validation from the table.
- Edit — Displays the Edit Valuation dialog box to enable details for the selected Validation to be edited.
Creating Calculation Formulas
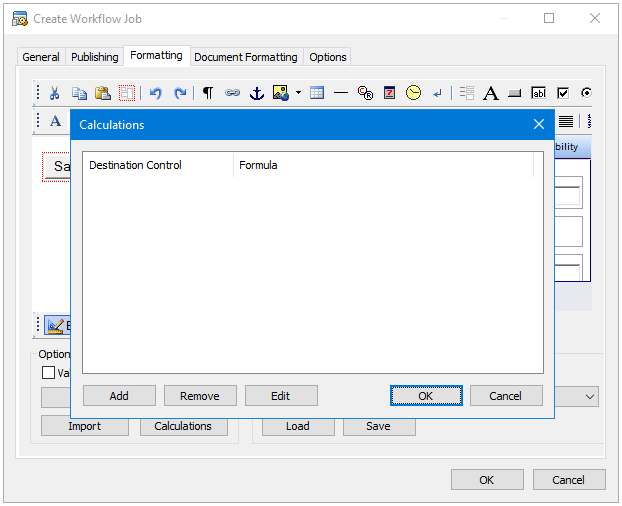
The Calculations dialog box is displayed when the Calculations button is selected in the Formatting tab of the Create Workflow Job dialog box. Validations may be created on controls within a Workflow Job web form so that when a Workflow Job is submitted, the Calculation formula is applied to the value entered in the form. For example a user may enter a value in Pounds Sterling which, after a Calculation formula is applied, will be provided in US Dollars.
The dialog box displays a list of Calculations created for controls contained within a Workflow Job and enables them to be edited, deleted or new Calculations created through the following:
- Calculations — Displays a list of Calculations created for the Workflow Job
- Add — Displays the Edit Calculation dialog box which contains the following controls for creating a new
Calculation:
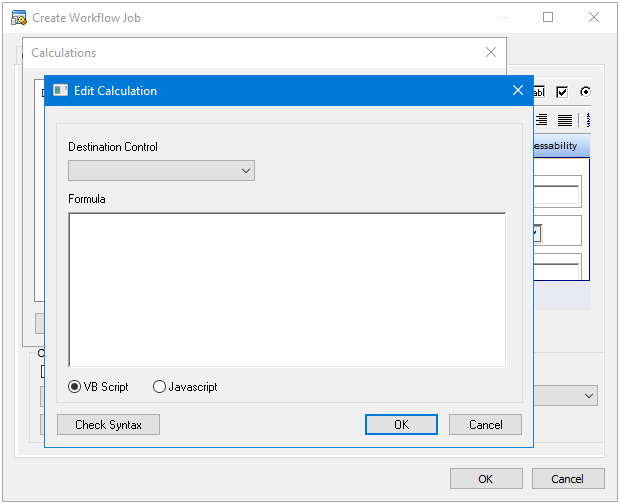
- Destination Control — Displays a list of controls available in the Workflow Job for selection
- Formula — A formula in either VBScript or Javascript, depending on the option radio button selected, may be manually entered
- VB Script and Javascript — Select the appropriate option for the script type you are using to create the formula
- Check Syntax — Allows you to check the calculation before saving
- Remove — Removes the selected Calculation from the table
- Edit — Displays the Edit Calculation dialog box to enable details for the selected Calculation to be edited
About the Document Formatting Tab
The Document Formatting tab allows the user to format text which is then available as a document to an Output tool which can read the records from this tool.
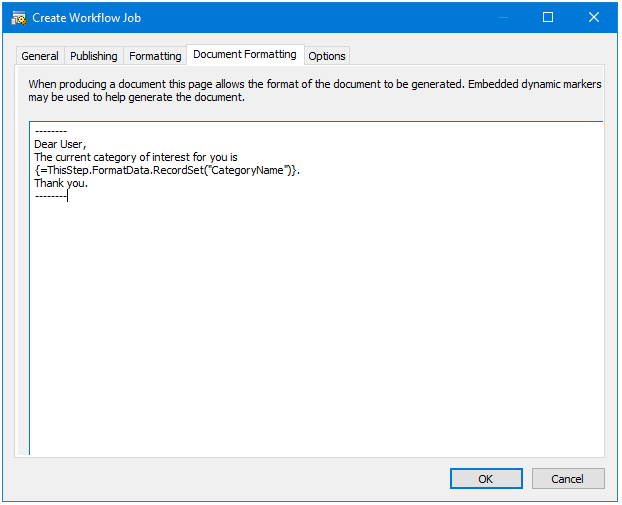
The document can contain any text and also dynamic content based upon the fields available in the Task. As an example, the following document sends the current category name to a user based on the recordset field:
--------
 Dear User,
 The current category of interest for you is
 {=ThisStep.FormatData.RecordSet("CategoryName")}.
 Thank you.
 --------
The Document Formatting tab should not be confused with the Formatting Tab. The Formatting tab produces output which is suitable for lookup on a web browser. This Document Formatting Tab provides a mechanism to format a document which can be sent more easily via email, SMS or other means.
About the Options Tab
The Options tab allows you to define how errors in this step are handled at task runtime.
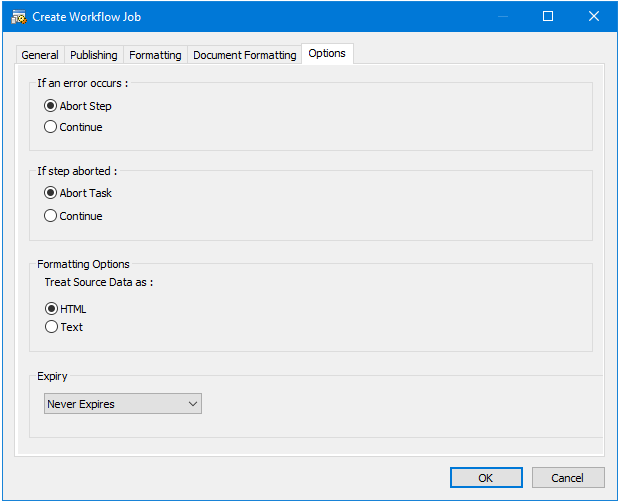
If an error occurs, you can decide whether the step should Continue processing, or terminate the step immediately (Abort Step).
If the step is aborted, you can choose to Continue processing onto the next step in the task, or terminate the whole task immediately (Abort Task).
Additionally, choose the following:
- Formatting Options — This area contains the following options to treat the source data as:
- HTML — If this option is selected then any controls contained in source data which would equate to specific functions in HTML are displayed as intended.
- Text — If this option is selected, any controls contained in source data which would equate to specific functions in HTML are converted such that they are displayed as text in the resultant HTML document
- Expiry — It is possible to specify an expiry time for each Workflow Job to prevent the BPA Platform store filling up with un-responded Workflow Jobs. After the specified time has expired, the next time the Task is run the Workflow Job is removed. This area contains the following options for specifying an expiry time:
- Numeric Field — A number may be manually entered.
- Drop Down List — Provides a list of the following options for selection:
- Never Expires
- 10 Minutes
- 1 Hour
- 6 Hours
- 12 Hours
- 24 Hours
- 3 Days
- 1 Week
- 1 Month
- 3 Months
- 6 Months
- 1 Year